
How to Use Z-Image Turbo to Generate Images Fast
A practical guide to Z-Image Turbo on APIMart: set up your key, write prompts, tune size, seed and resolution, and generate quality images for just $0.01 each.
Z-Image Turbo is a fast and affordable text-to-image generation tool powered by Alibaba's Tongyi Lab. It uses a 6-billion-parameter diffusion transformer (S3-DiT) to deliver high-quality images in just 8 steps, making it much faster than most models. Key features include bilingual text rendering (English and Chinese), multimodal workflows, and a pay-as-you-go pricing model starting at $0.01 per image.
Key Points
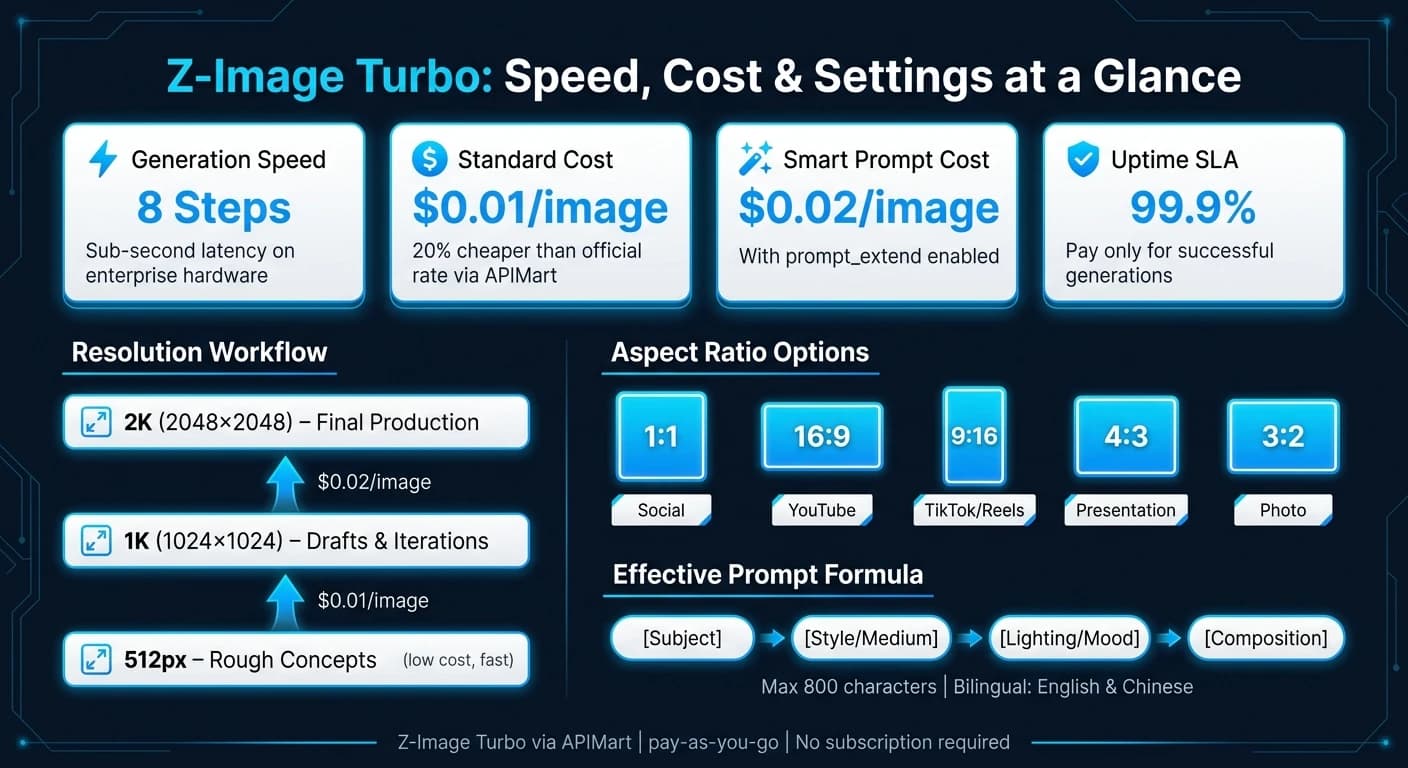
- Speed: Generates images in seconds with sub-second latency on enterprise hardware.
- Cost: $0.01 per image for standard generation, $0.02 with Smart Prompt Extension for higher quality.
- Versatility: Supports text-to-image, image-to-image transformations, and mask-based editing.
- Ease of Use: Accessible via APIMart’s unified API with a 99.9% uptime SLA.
To get started, sign up for a free APIMart account, fund your balance, and configure your API key. Use precise prompts for best results, and adjust settings like aspect ratio, resolution, and seed for consistent outputs. Whether you’re creating marketing visuals or refining product designs, Z-Image Turbo simplifies image generation while keeping costs low.
Setting Up Z-Image Turbo on APIMart
What You Need Before You Start
Before diving in, make sure you have a free APIMart account, some funds in your account, and a basic understanding of how to send POST requests using JSON and Bearer Token authentication.
The platform operates on a pay-as-you-go model, meaning there’s no subscription fee. Instead, your balance is deducted as you generate images. The good news? You won’t be charged for failed tasks.
Configuring Your Environment
Once you've got the basics covered, you can start configuring your environment.
After funding your account, head to the API Key Management page to generate your API key. Be sure to copy it immediately and store it securely - either in environment variables or a secret manager. Avoid hardcoding your API key into your source code, especially for client-facing applications.
When making requests, include your API key as a Bearer Token, like this:
Authorization: Bearer YOUR_API_KEY
Since the API is asynchronous, you’ll need to follow a two-step process. First, submit a request and get a task_id. Then, poll the /v1/tasks/{task_id} endpoint until the status updates to either completed or failed. Use a 2-second interval between polls to avoid unnecessary requests. Keep in mind, the generated image links are valid for only 24 hours, so if long-term storage is needed, download the images and save them on your own infrastructure.
"Integrating Z Image Turbo through APIMart was seamless. The API is well-documented and the response times are consistently fast." - Maria Rodriguez, Backend Developer [1]
Rate Limits and Usage Guidelines
If you’re sending a high volume of requests, you might encounter a 429 (Rate Limit Exceeded) error. To handle this, slow down your requests and implement exponential backoff for retries. This helps avoid overloading the API and keeps your integration running smoothly.
For workflows that involve frequent image processing, consider using webhooks instead of manual polling. Webhooks allow the API to push results directly to your endpoint, saving time and resources - perfect for batch processing.
Here’s a quick reference table for common error codes and how to address them:
| Status Code | Description | What to Do |
|---|---|---|
| 401 | Authentication failed | Verify your API key |
| 402 | Insufficient balance | Add funds to your account |
| 429 | Rate limit exceeded | Slow down requests and use exponential backoff |
| 500 | Server error | Wait briefly and retry the request |
Lastly, remember that each request generates a single image. If you’re looking for multiple variations, you’ll need to send separate requests.
How to Generate Images with Z-Image Turbo
Writing Effective Prompts
Crafting a precise prompt is key to getting results that align with your vision. Z-Image Turbo works best when prompts follow a clear four-part structure: Subject → Style/Medium → Lighting/Mood → Composition.
| Prompt Component | Description | Example |
|---|---|---|
| Subject | The main focus of the image | "A young woman reading a book in a library" |
| Style/Medium | The artistic style or format | "Photorealistic", "3D render", "Flat vector illustration" |
| Lighting/Mood | The atmosphere or light source | "Golden hour", "Soft studio lighting", "Neon lighting" |
| Composition | The framing or camera angle | "Close-up", "Wide shot", "45-degree angle" |
For product photography, be as literal as possible. For example, a prompt like "matte black wireless earbud on a white seamless background, soft studio lighting, 45-degree angle" will yield better results than a vague one like "cinematic, moody product shot." Mixing conflicting styles can confuse the model and lead to less focused results.
One standout feature of Z-Image Turbo is its ability to render text within images - perfect for posters, banners, or social media designs. To include text, simply add it in quotes within your prompt. For instance: title "FUTURE FEST" in large metallic typography, dark concert background, wide shot. Prompts can be up to 800 characters long, so keep them concise but detailed - anything beyond that limit gets cut off.
If you're struggling to describe your idea in detail, you can enable the prompt_extend parameter. This feature enhances your input by generating a richer, more descriptive prompt automatically - great for when you have a general idea but lack the exact words. [1]
Once your prompt is ready, you can refine your image further by adjusting specific settings.
Adjusting Image Settings
Fine-tuning image settings allows you to control the format, resolution, and reproducibility of your outputs.
- Aspect Ratio: Use the
sizeparameter to define the image's shape. Options include1:1,16:9,9:16,4:3, and3:2. - Resolution: Set this to
1K(1024×1024) for drafts or2K(2048×2048) for final images. A practical tip? Start with 1K for quick iterations, then switch to 2K for polished results. For even higher fidelity, models like GPT Image 2 offer native 4K output. This approach saves time and reduces costs. - Seed: The
seedparameter (range:0to2,147,483,647) ensures reproducibility. Save the seed value for an image you like, so you can tweak elements - like lighting or colors - while maintaining the overall structure. - File Format: Choose the output format based on your needs:
- PNG: Ideal for lossless quality or UI overlays.
- JPEG: Best for quick web previews.
- WebP: A great middle ground between file size and quality.
Sending API Requests and Getting Images Back
Once your prompt and settings are finalized, you can generate images using the API. Start by making a POST request to https://api.apimart.ai/v1/images/generations with your parameters in JSON format and your API key as a Bearer Token.
Here’s an example of a basic API call:
POST https://api.apimart.ai/v1/images/generations
Authorization: Bearer YOUR_API_KEY
Content-Type: application/json

{
  "model": "z-image-turbo",
  "prompt": "matte black wireless earbud on a white seamless background, soft studio lighting, 45-degree angle, photorealistic",
  "size": "1:1",
  "resolution": "1K",
  "seed": 12345,
  "prompt_extend": false
}
The process is asynchronous. After submitting your request, the API returns a task_id. Use GET /v1/tasks/{task_id} to poll for completion every 2 seconds. Once finished, you’ll receive a CDN-hosted image URL. Keep in mind, this URL is valid for 24 hours, so download the image promptly if you need to store it longer. [1]
"The image quality from Z-Image Turbo is impressive given the fast generation time. It's become our go-to model for quick prototyping and concept visualization." - David Kim, Product Designer [1]
Each API request generates a single image. If you want multiple variations of the same prompt, submit separate requests. You can use different seed values to explore alternative compositions while keeping the subject consistent.
Using Z-Image Turbo in Creative Workflows
Generating Marketing Visuals
Z-Image Turbo produces images in just 2–4 seconds, giving marketing teams the ability to test 6–10 different prompt variations in the time it would normally take for a single high-quality render.
For product photography, stick with a straightforward prompt structure: Subject + Angle + Context. For example, a prompt like: "matte ceramic coffee mug on a natural wood surface, overhead shot, soft diffused morning light, photorealistic" delivers cleaner, more predictable results compared to vague descriptions. Start by generating 20–30 1K variants to fine-tune your composition, then upscale the best option to 2K for the final render.
"Batch generation enables rapid A/B testing for marketing campaigns." - Emma Wilson, Marketing Lead
The tool also supports bilingual text, making it an excellent choice for multilingual campaigns. These techniques easily adapt to fit into existing creative workflows.
Using Generated Images in Video Projects
Z-Image Turbo integrates seamlessly into video production, particularly for tasks like rapid storyboarding. By generating 12–20 frames, you can quickly establish the mood, composition, and flow of a scene without committing to a full video draft. This approach saves both time and resources compared to traditional methods.
To maintain visual consistency when sequencing frames, lock the seed value. Then, tweak just one variable at a time - like camera angle or lighting - so the core structure remains intact while exploring different visual options. Once finalized, the key frames can serve as reference images or even direct assets for APIMart's video tools, such as Kling V3.
Choosing the right aspect ratio is another way to optimize your workflow. For YouTube widescreen content, use 16:9 (1280×720 at 1K). For vertical formats like TikTok, Reels, or Shorts, switch to 9:16 (720×1280 at 1K). Generating previews at 1K resolution keeps costs manageable, while upgrading only the final assets to 2K ensures top-notch quality where it matters most.
These features can also be extended to other creative projects with ease.
Image-to-Image Transformations
Z-Image Turbo isn't limited to text-to-image generation - it also excels at transforming existing assets. This is especially handy for tasks like changing the visual tone of an image, swapping backgrounds, or adapting product photos to new settings without starting from scratch.
By uploading a PNG mask, you can isolate specific areas for editing. For instance, if you want to replace only the background of a product photo, the mask ensures the model updates just that area while leaving the product untouched. Pairing the mask with a detailed text prompt - for example, "replace background with a minimalist concrete studio setting, soft overhead lighting" - helps achieve precise results.
For more complex transformations, enable the prompt extension feature. This option enriches your input automatically, which can be particularly helpful when multiple visual changes are required, ensuring the final output is cohesive and polished.
Optimization and Troubleshooting
Getting Better Image Quality
Z-Image Turbo works best with exactly 8 inference steps (8 NFEs). This is the ideal balance where speed meets photorealism. Going beyond 8 steps won’t improve the results and only adds unnecessary processing time.
To achieve the best results, establish your style early - try something like "high-end product photography" or "cinematic lighting". Avoid mixing conflicting style descriptors such as "cinematic, moody, editorial, glossy, watercolor", as this can dilute the final output.
If your images appear slightly soft, a simple fix is to generate them at 2K resolution and then downscale to 1K. This method helps mask subtle texture softness that may show up in the quick 8-step renders. Also, set guidance_scale to 0 to ensure consistent quality across outputs [3].
Balancing Speed, Cost, and Quality
Once you’ve optimized image quality, the next step is to balance speed, cost, and output quality. Z-Image Turbo keeps costs low, with standard generation priced at $0.01–$0.02 per image, making it ideal for high-volume projects or explore gpt-image-1 for alternative high-quality generation. To keep expenses in check, use a resolution ladder: start with rough concepts at 512px, refine them at 1K, and save 2K resolution for final production. Keep in mind that enabling the prompt_extend feature doubles the cost to $0.02 per image [1].
For large batch processing, switch to async mode (using task_id polling) to avoid timeouts during heavy use. If you encounter API rate-limit errors (429), implement exponential backoff with random delays between 50–200ms to manage bursts effectively [2].
When choosing file formats, use JPEG for previews to reduce bandwidth usage. Reserve WebP or PNG for final assets when lossless quality or transparency is required [2].
Keeping Visuals Consistent Across Campaigns
Consistency is crucial for cohesive campaigns, and the seed parameter is your best tool for this. A fixed seed ensures that the same composition is reproduced across iterations, making it easier to tweak specific elements like backgrounds or lighting. For example, swapping "white studio background" with "warm sunset background" keeps the subject and overall feel intact. To achieve this, replace the default -1 (random) seed with a fixed integer.
"Seeds are a sanity trick. When a result had the right vibe but the wrong detail, I kept the seed and adjusted one setting at a time." - Dora, WaveSpeed Blog [4]
Pair fixed seeds with a structured prompt template, such as Subject + Angle + Context + Style Anchor, to maintain a unified visual language. This approach minimizes manual adjustments while ensuring consistency. Additionally, logging details like the prompt, resolution, and seed in a manifest.json file allows you to easily re-render or tweak assets later without losing the original look.
Ultimate Z Image Turbo Guide + ComfyUI (Install, LoRA, Inpaint, Img2Img)
Conclusion
Z-Image Turbo offers a fast and cost-effective way to generate high-quality images, making it a practical tool for creative projects. At just $0.01 per image through APIMart - 20% cheaper than the official rate - it’s a budget-friendly option for large-scale AI image generation [1].
This guide has outlined the best ways to use Z-Image Turbo to optimize your workflow. By following these steps, you can simplify your production process and achieve better results.
With APIMart’s 99.9% uptime SLA and pay-as-you-go billing, you’re only charged for successful generations. This ensures you can confidently create marketing visuals or video storyboards without worrying about unexpected costs or downtime [1]. Incorporate these strategies into your workflow to maximize efficiency and elevate your creative output.
FAQs
What parameters matter most for consistent images?
To get consistent results with Z-Image Turbo, pay attention to three key elements: seed, prompt, and resolution. Use a fixed integer for the seed to make sure your results can be replicated. For prompts, aim for clear and concise natural language, ideally between 30 and 120 words. Stick to a consistent aspect ratio and resolution tier, as these will directly influence the image's size and overall composition.
How do I store images after the 24-hour link expires?
To keep images accessible after the 24-hour preview link expires, make sure to download the file to your local storage or server while the link is still active. Additionally, Z-Image Turbo mirrors images to the platform's CDN, providing extended access. For long-term storage, consider saving the files to your project folders or a cloud storage solution to ensure they remain available for your workflows.
How can I avoid 429 rate-limit errors in batches?
To avoid hitting 429 rate-limit errors during batch processing, consider using exponential backoff to control how often requests are sent, especially under heavy load. For larger tasks, switch to the async delivery method. This lets you either poll for results using the task UUID or receive updates through a webhook. Minimize frequent polling by accounting for longer processing times and caching results, as image links stay valid for up to 24 hours.
Choose the model you want in the model marketplace
Try chat, image and video models in the APIMart model marketplace, and experience model capabilities quickly with one unified API.