Kling 3.0 Fast: Cheap AI Video with Synced Audio
A developer guide to Kling 3.0 Fast: cheaper, faster AI video with synced audio. Covers text- and image-to-video, pricing, async jobs and APIMart access.
If you need short AI videos with audio in sync, this model is built for low-cost, high-volume jobs. I’d use it for 3–15 second clips, especially when turnaround and per-clip spend matter more than top image quality (like that found in WAN 2.6).
Here’s the short version:
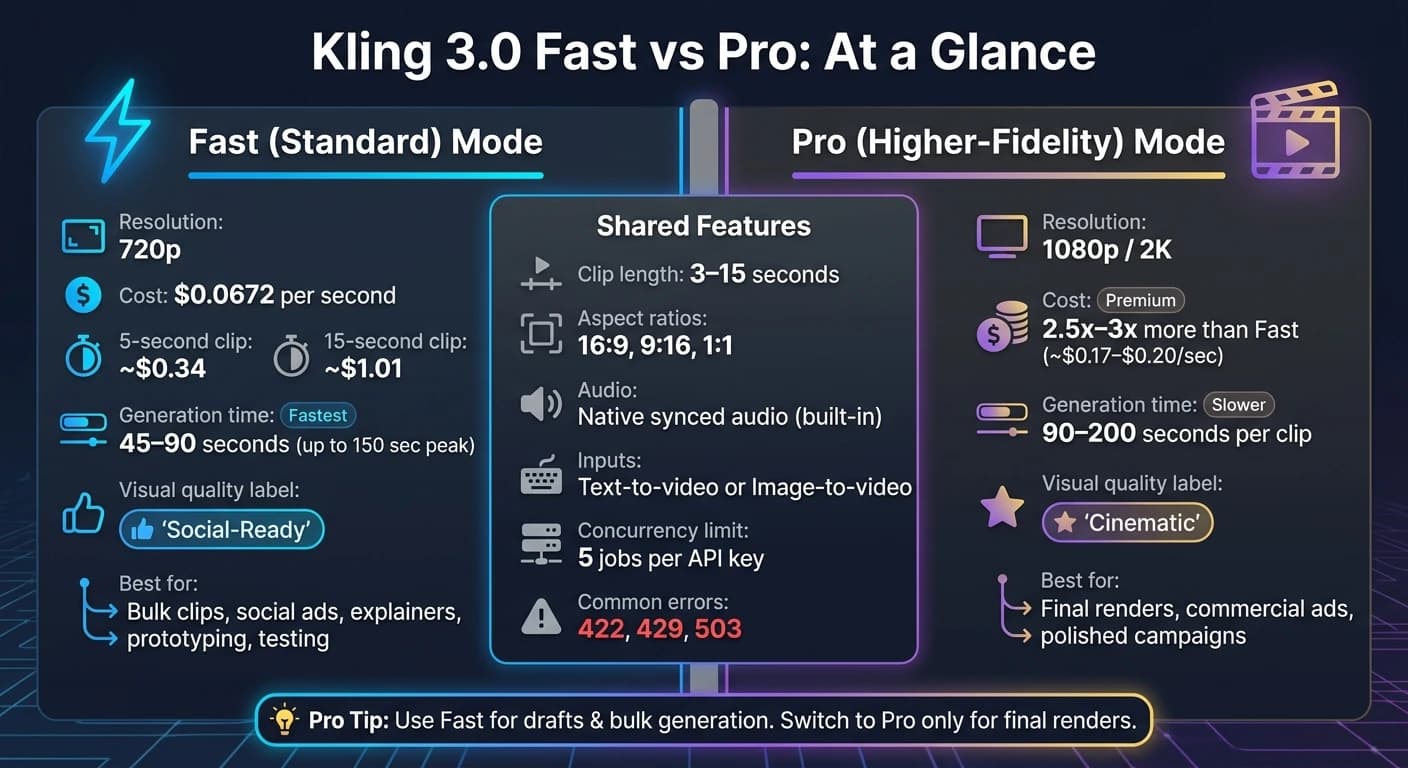
- Cost: about $0.0672 per second at 720p
- 5-second clip: about $0.34
- 15-second clip: about $1.01
- Typical wait time: about 45–90 seconds for a 5-second clip
- Peak-hour delay: up to 150 seconds
- Audio: built into the same job, so no second pipeline
- Inputs: text-to-video or image-to-video
- Clip length: 3 to 15 seconds
- Aspect ratios: 16:9, 9:16, 1:1
- Common errors: 422, 429, 503
- Concurrency limit: often 5 jobs per API key
In plain terms: if you’re making social ads, product clips, explainers, or test variants at scale, this is the mode I’d start with. If you need 1080p, 2K, or top-end polish, I’d move to Pro and accept the higher price and longer wait.
What matters most is the tradeoff: lower spend and shorter turnaround now, or sharper output later. For those prioritizing visual fidelity, MiniMax-Hailuo-02 offers a strong alternative.
| Mode | Resolution | Cost | Wait Time | Best For |
|---|---|---|---|---|
| Fast | 720p | $0.0672/sec | 45–90 sec for 5s clip | Bulk clips, tests, social, explainers |
| Pro | 1080p / 2K | 2.5x–3x more | 90–200 sec/clip | Final renders, polished campaigns |
I’d sum it up like this: use Fast for draft-stage volume, wire it into an async flow with polling or callbacks, store the MP4 right away, and keep retries under control with backoff and jitter.
Build a Complete AI Video Automation System (Step-by-Step Tutorial) Kling API + Make + Google Sheets
What Kling 3.0 Fast Does in an API Workflow
Kling 3.0 Fast is built for high-volume text-to-video and image-to-video jobs, with synced MP4 output. That makes the setup pretty simple and helps keep the cost per clip down. Once the workflow is in place, the next move is picking the right input mode and generation settings, or comparing it with models like MiniMax-Hailuo-2.3.
Text-to-Video and Image-to-Video Inputs
In text-to-video mode, you send a prompt of up to 2,500 characters that describes the scene, actions, and style. You can also add an optional negative_prompt to leave out unwanted elements like "blurry" or "low quality" [1][6][10].
In image-to-video mode, you pass a start_image_url to set the first frame. You can also include an optional end_image_url to guide transitions or morphing [9][10]. Source image dimensions may override the aspect ratio setting [1][6].
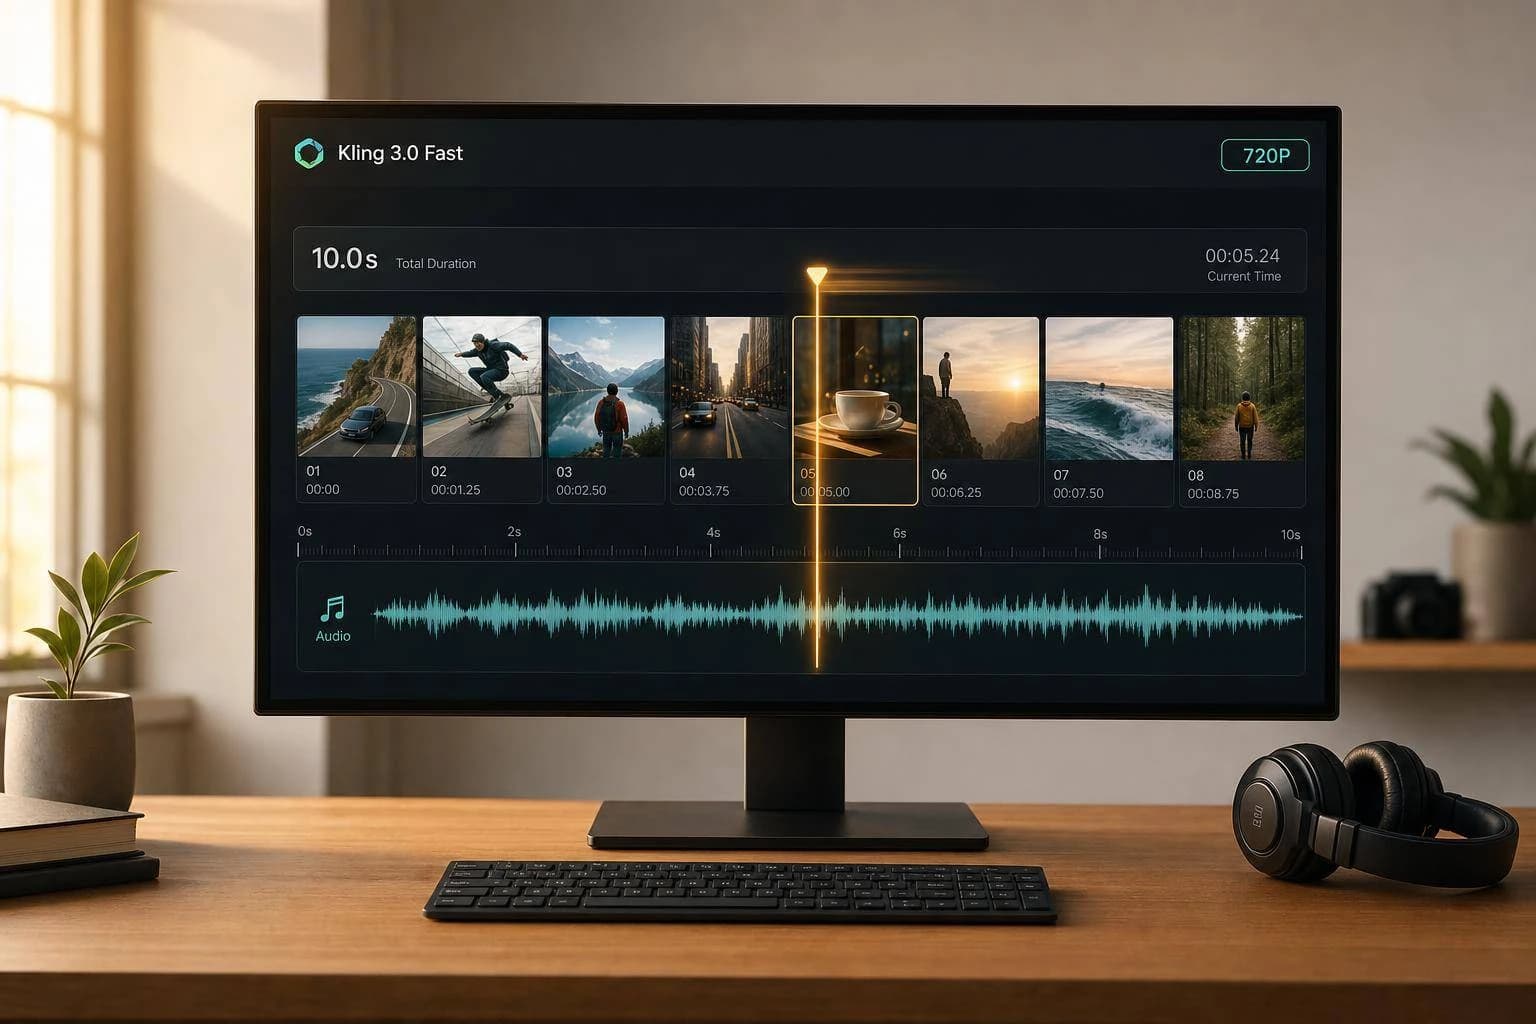
Both modes support clips from 3 to 15 seconds, with aspect ratios such as 16:9, 9:16, and 1:1. You can turn on native audio with a boolean flag. And if you want several connected scenes in one request, use multi_prompt for 2–6 scenes [8][6].
Async Job Flow: Submit, Track, Retrieve
Every generation request follows the same basic flow:
| Step | Action | Output |
|---|---|---|
| Submit | POST /v1/videos/generations | task_id |
| Track | GET /v1/tasks/{task_id} | processing |
| Retry on 422, 429, or 503 | Check error codes | retry or adjust prompt |
| Retrieve | Access output_url | MP4 with synced audio |
| Persist | Move to permanent storage | download to permanent storage |
Download the time-limited output URL right away, then copy the MP4 to permanent storage. Store the task_id with user metadata and timestamps so you can recover state if a polling worker fails mid-run. For high-volume jobs, use a callback_url instead of polling. Polling burns through requests when volume climbs [11].
Those mechanics shape when Fast mode makes sense as a tradeoff, which the next section covers.
When to Use Kling 3.0 Fast
From an integration angle, Fast mode is the default pick when throughput matters more than top-end image fidelity. It works best for short clips, fast testing, and bulk generation.
Best-Fit Use Cases: Marketing Clips, Product Videos, and Educational Explainers
Fast mode works well for short-form content, and synced audio is a big reason these use cases line up so well with it.
| Use Case | Practical Video Length | Primary Goal |
|---|---|---|
| Social Media Ads | 5–15 seconds | High engagement, rapid variants |
| Product Teasers | 3–10 seconds | Visual consistency, prop detail |
| Educational Snippets | 5–15 seconds | Audio-visual synchronization |
| Pre-viz / Storyboarding | 3–5 seconds | Motion testing, staging |
| In-app Automation | 5–10 seconds | Bulk generation, low cost |
For e-commerce and product teams, Fast mode is a good match for multi-angle product shots. Camera controls like pan, zoom, and dolly make it easier to show a physical product from different viewpoints in a short clip [4][2].
For educational and SaaS teams, native audio removes a separate merge step, which keeps the workflow simpler. Native audio supports five languages - Chinese, English, Japanese, Korean, and Spanish - plus regional dialects [2].
That same speed edge also helps with vertical social video. Fast mode’s 9:16 aspect ratio fits vertical social formats [4][7]. And since those platforms often compress video heavily, 9:16 Fast output will usually match what those channels can display.
When Fast Mode Is the Right Tradeoff
Fast mode is the right default for quick iteration and bulk testing. It keeps retry costs lower while teams test prompts, shots, and variants. It also fits high-volume workflows where hundreds of clips are generated each hour [11].
If you're running large batches, timing matters. Scheduling jobs during off-peak hours can improve turnaround and lower the chance of 503 MODEL_OVERLOADED errors, which show up more often during U.S. and EU daytime peak hours [12].
Fast mode is not the best fit for flagship campaigns, cinematic storytelling, or any project where 1080p or 4K is a hard requirement.
Once the use case is clear, the next section shows how to call Kling 3.0 Fast through APIMart.
How to Call Kling 3.0 Fast Through APIMart

Use POST https://api.apimart.ai/v1/videos/generations with a JSON payload and an Authorization header [1]. From there, the main job is shaping the request body so speed and audio sync hold up in production.
Setup: Account Access, API Key, and Model Selection
Create your APIMart account, then generate an API key from the dashboard. If you want Kling 3.0 Fast, set "model": "kling-v3" and "mode": "std" in the request body. (Alternatively, you can use Grok Imagine Video for high-quality text-to-video generation.)
Request Design: Prompts, Source Images, Duration, and Audio Settings
If your goal is fast, lower-cost output, keep the request lean and specific. Use a prompt of up to 2,500 characters, and add a short negative_prompt to cut common artifacts. Put the subject, action, and style near the start. Keep spatial directions simple. In plain English: don't make the model guess.
For image-to-video, send image_urls as public URLs. One URL sets the start frame. Two URLs define a start-to-end transition. Source images need to be at least 300×300 px and under 10 MB [9].
A few fields matter most:
- Set
audiototrueif you want synced audio. - Use a whole number from 3 to 15 for
duration. - Set
aspect_ratioto"16:9","9:16", or"1:1".
Once the request is dialed in, day-to-day handling is what keeps the workflow moving fast when volume goes up.
Production Handling: Polling, Callbacks, Retries, and Asset Storage
A 5-second clip usually finishes in 45–90 seconds, but during peak hours, jobs can take up to 150 seconds [5]. You can poll every 30 seconds, or pass a callback_url so APIMart sends the result when the job is done. If you're making more than a few clips per hour, callbacks cut wasted polling load [11].
For errors, you'll most often run into 429 (rate limit), 422 (content moderation rejection), and 503 (service overloaded). For 429 and 503, use exponential backoff with jitter [11]. Also, cap concurrent jobs at 5 per API key unless your plan says otherwise [11]. And one more thing: move the MP4 to permanent storage before the temporary link expires.
These request choices have a direct effect on both cost and turnaround.
Pricing, Performance, and Deployment Decisions
Cost and Speed Tradeoffs for Short-Form Video Generation
Once your request structure is locked in, cost and latency become the big deployment levers.
With Kling 3.0 Fast, pricing is simple: you pay per second of video generated. On APIMart, that comes to $0.0672 per second for Kling 3.0 Fast at 720p [3]. So a 5-second clip costs about $0.34, while a 15-second clip lands around $1.01. In practice, total spend is driven by three things: duration, resolution tier, and whether you turn on native synced audio [6][7].
The part many teams miss is the cost per usable clip. A single generation price can look cheap on paper. But if you need 3–5 prompt iterations before you get something you can ship, the math changes fast. Four attempts push a 5-second clip to about $1.35.
Fast mode gives you lower cost and shorter wait times. Pro mode costs 2.5x–3x more and takes longer [11], with generation latency stretching to 90–200 seconds per clip [4]. A simple way to handle it: use Fast for drafts, tests, and bulk asset creation. Save Pro for the final render.
Comparison Table: Fast Mode vs. Higher-Fidelity Mode
Use the table below to choose between Fast and Pro mode quickly.
| Feature | Fast (Standard) Mode | Higher-Fidelity (Pro) Mode |
|---|---|---|
| Resolution | 720p | 1080p / 2K |
| Cost Factor | 1.0x (Baseline ~$0.0672/sec) | 2.5x–3x Baseline [11] |
| Generation Speed | Faster turnaround | Longer latency (90–200 sec/clip) [4] |
| Visual Quality | Clean, social-ready | Cinematic, high-detail |
| Best Use Case | Prototyping, social media, explainers | Final renders, commercial ads, product demos |
Conclusion: How to Choose and Deploy Kling 3.0 Fast
At this stage, the choice is pretty simple: do you need fast iteration or final-polish output?
For short clips with synced audio, Fast mode is the default when turnaround matters more than cinematic polish. The deployment call comes down to a few plain rules:
- Match the mode to the job
- Prepare clean inputs and specific prompts
- Build steady async handling with polling or callbacks, plus exponential backoff and jitter
Use Fast mode when speed and budget matter most. Start with small tests, validate your prompts, and scale once the output quality holds steady.
FAQs
How do I choose Fast vs. Pro?
Choose based on output quality, budget, and how fast you need to test ideas. Fast is the lowest-cost option and gives you 720p video, which makes it a good fit for early testing and quick prototypes.
Pro gives you sharper 1080p visuals for final videos people will actually see. Because higher tiers and audio burn more credits per second, many teams start with Fast and move to Pro only when it’s time for final production.
What should I do if a video job fails?
If a video generation job fails, treat the task ID as the main reference point in your app state. Save the task ID, the original request payload, and any job metadata before the job begins.
That gives you a reliable way to recover the job state or check status if a webhook breaks or your polling worker misses an update. It also helps to add retry logic and clear failure handling around task polling so your system can deal with temporary issues without falling over.
When should I use callbacks instead of polling?
Use callbacks instead of polling for production integrations that need to handle long-running requests.
With polling, your app keeps checking task status with a task ID over and over. It gets the job done, but it can add noise, waste requests, and make the flow feel clunky.
Callbacks work better for this kind of setup. Once processing is done, the system sends the result straight to your server. That means no constant status checks, less back-and-forth, and a setup that stays cleaner and more responsive.