
How to Use Seedance 1.0 Pro Quality - Full Guide
Step-by-step Seedance 1.0 Pro Quality guide - set up APIMart, write effective prompts, configure resolution and seed, and render pro AI videos via the API.
Seedance 1.0 Pro is a cloud-based AI tool by ByteDance that generates high-quality videos (up to 1080p at 24 FPS) from text or images. It’s perfect for filmmakers, marketers, developers, and educators who need consistent, professional-grade video content. Key features include multi-shot coherence, cinematic camera controls (e.g., dolly, zoom), and precise prompt-based video generation. For alternative cinematic results, you can also explore Kling V3 API.
To get started:
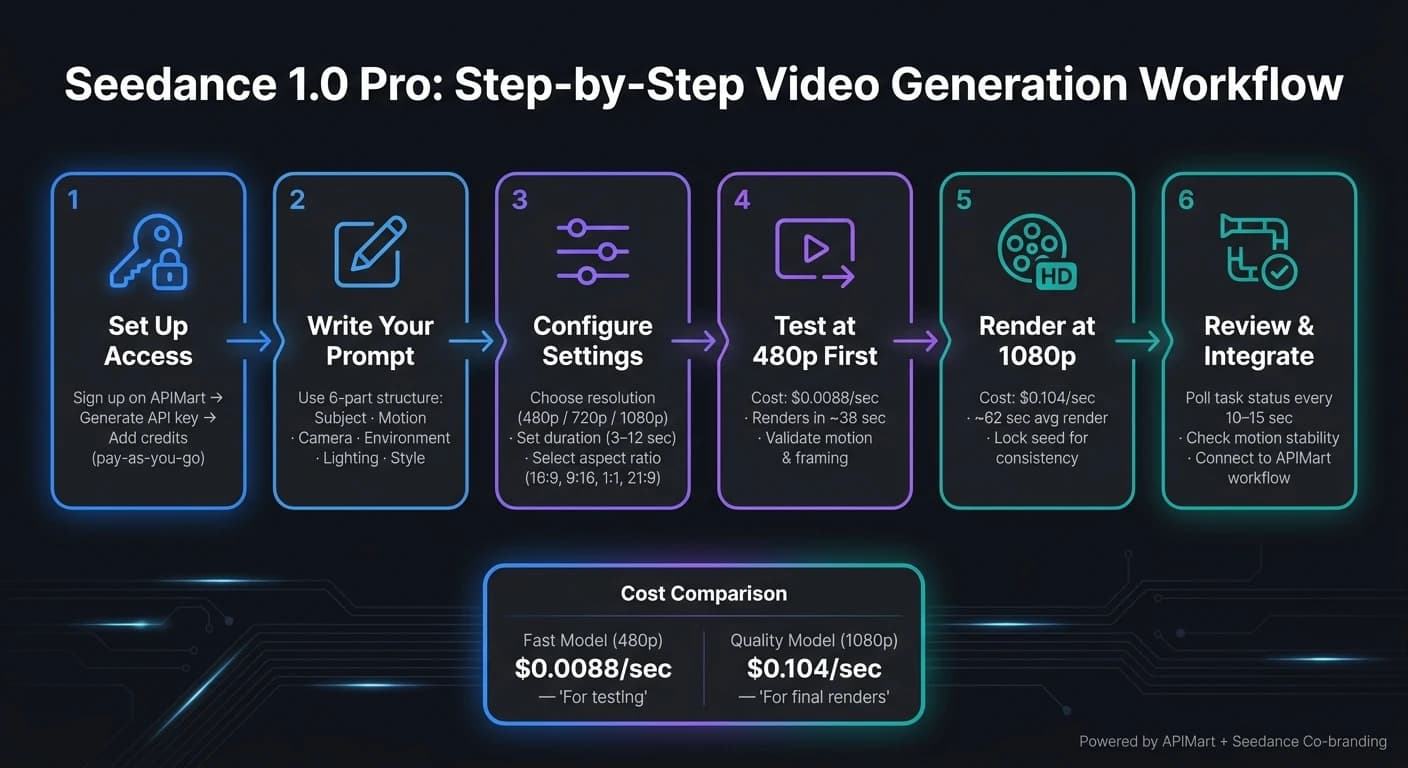
- Sign up on APIMart and generate an API key.
- Pay-as-you-go pricing: $0.104 per second for 1080p videos.
- Submit a POST request to the API with your video details, similar to the process for Grok Imagine Video.
- Use structured prompts for best results (e.g., subject, motion, lighting).
- Test at 480p before scaling to 1080p to save costs.
For high-quality output, lock the seed for consistent results, adjust motion intensity for stability, and match aspect ratios to your platform. Seedance 1.0 Pro is ideal for creating seamless, professional videos efficiently.
Setting Up Seedance 1.0 Pro
System Requirements and Supported Inputs
Seedance 1.0 Pro operates entirely in the cloud, meaning any internet-connected device can handle it. To interact with the platform, you'll need an HTTP client like Python, Node.js, or cURL, and the system processes JSON requests. Here's a quick overview of the setup requirements:
| Requirement | Detail |
|---|---|
| Hardware | Any device with internet access |
| Software | Python, Node.js, cURL, or any HTTP client |
| Input Formats | PNG, JPG, or Base64-encoded image strings |
| Output Formats | MP4, WEBM, or MOV |
| Supported Resolutions | 480p, 720p, 1080p |
| Video Duration | 3 to 12 seconds |
For the best results when converting images to video, use high-resolution PNG or JPG files. Make sure the subject is centered and the background is clean. Additionally, ensure your image’s aspect ratio aligns with your desired video output (e.g., 16:9 for widescreen) to avoid distortion or cropping.
Accessing Seedance 1.0 Pro via APIMart

Getting started with Seedance 1.0 Pro through APIMart is simple. Just follow these steps:
- Sign Up for a Free Account
Head to apimart.ai and create an account. - Generate Your API Key
Navigate to the API Key Management section in the APIMart dashboard to generate your API key. This key will serve as your Bearer Token for API requests. To keep it secure, store it in an environment variable instead of embedding it directly in your code. - Add Credits to Your Account
APIMart uses a pay-as-you-go pricing model. Before making requests, you’ll need to add funds. For example, thedoubao-seedance-1-0-pro-qualitymodel at 1080p costs $0.104 per second, so a 5-second video would cost about $0.52. - Submit Your API Request
Send a POST request tohttps://api.apimart.ai/v1/videos/generationswith themodelparameter set todoubao-seedance-1-0-pro-quality.
Since video generation is asynchronous, the API will return a task_id instead of the finished video. You’ll need to check the status endpoint every 10–15 seconds until the task is marked as "completed." Once ready, the video URL will be provided. You can then refine your creation using the AI Canvas editor for further adjustments. For reference, rendering a 5-second 1080p video typically takes 40 to 56 seconds.
Pro Tip: Start with the doubao-seedance-1-0-pro-fast model at 480p, which costs $0.0088 per second. It’s a cost-effective way to test your prompts and animations before committing to higher-quality renders or exploring other models like WAN 2.6.
"The dual-mode switching is fantastic. We can use Doubao Seedance 1.0 Pro Turbo Mode to test ideas in seconds, then use Quality Mode to generate final marketing videos. Huge efficiency boost." - Marcus Chen, Creative Director
Create Ultra-Realistic AI Videos with Seedance 1.0 Pro – Full Step-by-Step Tutorial
Writing Effective Prompts for Seedance 1.0 Pro
The quality of your video output hinges on how clearly you guide the model. Seedance 1.0 Pro follows your instructions precisely, translating them into motion without making assumptions.
"Seedance reads your prompt as a directing plan, converting clear instructions into predictable motion rather than filling gaps with assumptions." - Segmind [10]
How to Write Text-to-Video Prompts
Think of your prompt as a director's shot list, not just a vague description of the mood. Use this 6-part structure to ensure the model captures every detail needed for a seamless video:
| Element | What to Include | Example |
|---|---|---|
| Subject | Physical description and position | "Professional chef in white uniform, mid-30s" |
| Motion | Primary action with specific verbs | "Chopping vegetables with rhythmic knife movements" |
| Camera | Angle and movement type | "Static medium shot from a slightly elevated angle" |
| Environment | Background and spatial context | "Modern commercial kitchen with stainless steel surfaces" |
| Lighting | Light sources and mood | "Warm overhead task lighting with soft shadows" |
| Style | Visual aesthetic and quality | "Photorealistic, documentary style, 4K, sharp detail" |
Pick cinematic verbs to convey emotion and impact. For instance, instead of "walks", use "struts", or swap "looks" for "glares" or "flinches" to create a stronger emotional tone.
For multi-scene narratives, structure your prompt like this: "Shot 1: [Action] … then CUT TO Shot 2: [Action]." This approach ensures smooth continuity. Also, keep in mind that the model prioritizes the first action in your prompt, so lead with the most critical detail.
How to Write Image-to-Video Prompts
In Image-to-Video (I2V) mode, the reference image determines the subject's appearance. Your focus should shift to describing movements, background changes, and camera directions. For example:
"Subject slowly turns their head to the right, hair lifting in the breeze, while the background bokeh softly pulses - slow dolly push toward the face."
This method ensures you address subject motion, environmental dynamics, and camera movement without conflicting with the reference image.
A technical note: Camera movement commands like "pan left" or "dolly in" will only work if the Fixed Camera setting is turned off. If it's on, these instructions will be ignored.
Tips for Improving Prompt Quality
Building on the structures above, here are some quick tips to refine your prompts:
- Always describe motion; static prompts will result in static videos.
- Avoid negative instructions. Instead of saying "not blurry", specify "sharp focus with crisp details."
- For added realism, separate subject actions from background movement. For example: "Dancer performs a slow pirouette while curtains sway."
- Use sequence words like "first", "then", and "finally" to guide the model through multi-step actions.
Once your prompt and motion details are finalized, lock the Seed parameter to create consistent variations. For projects requiring different visual styles, you can also explore professional text-to-video models like WAN 2.5.
Configuring Video Settings for High-Quality Output
Once your prompt is finalized, the next step is fine-tuning your video settings. These configurations determine the final quality of your video, ensuring it meets professional standards. Tailor these settings to align with your project's specific requirements.
Resolution, Duration, and Aspect Ratio Settings
Start by generating a 480p, 5-second test clip. This helps you verify motion accuracy and how well the video adheres to your prompt. Once satisfied, scale up to 1080p for the final render. For reference, a 5-second clip at 1080p costs approximately $0.484[3].
For longer productions, consider rendering 10–12-second clips. These provide enough time for the model to create more complex, multi-shot sequences[4]. The aspect ratio should match the platform where your video will be displayed. Here’s a quick guide:
| Aspect Ratio | Best For | Dimensions at 1080p |
|---|---|---|
| 16:9 | YouTube, cinematic content | 1920 x 1088 |
| 9:16 | TikTok, Reels, Shorts | 1088 x 1920 |
| 1:1 | Instagram square posts | 1440 x 1440 |
| 21:9 | Ultra-wide, cinematic | 2176 x 928 |
The Seedance 1.0 Pro software outputs at a fixed 24 FPS, which ensures smooth, cinematic motion[4].
Once these basics are set, you can further enhance your video with the advanced settings offered by Seedance.
Advanced Settings in Seedance 1.0 Pro
Seedance’s advanced controls allow for greater precision in your video output. Lock the Seed parameter to maintain consistent motion and framing across different resolutions or durations[1][5].
For static shots, enable the cameraFixed toggle. This prevents any panning, tilting, or zooming in your video[3][2]. If you want camera movement, use specific film direction terms like "slow dolly forward," "tracking shot," or "orbit left" to ensure smooth and predictable motion paths[6].
You can adjust output quality compression on a scale of 20 to 99. The default setting of 95 is ideal for most professional projects[3]. For color and lighting, Seedance responds well to descriptive language in your prompt. For example, phrases like "soft diffused morning light" or "neon reflections on wet asphalt" produce more nuanced visuals than generic tags like "cinematic"[4].
If you notice jittery or unstable motion, try reducing the motion intensity parameter. This is especially helpful in crowded scenes with multiple subjects, which are more prone to instability compared to simpler, single-subject compositions[6].
Generating and Reviewing Video Outputs
Once your settings are in place, you’re ready to generate your video. Here’s a step-by-step guide to ensure a smooth process.
How to Start the Video Generation Process
To begin, select Seedance 1.0 Pro or other high-quality video models, choose your mode - either Text-to-Video or Image-to-Video - and provide your prompt or image URL. Before hitting generate, double-check key settings like duration, resolution, aspect ratio, and seed.
Start with a 5-second 480p preview to quickly identify any motion or alignment issues. This preview typically takes about 38 seconds to render [2]. If you opt for a 5-second 1080p preview instead, it will take roughly 40 seconds [4]. Once you initiate the request, you’ll receive an asynchronous job_id to track its progress [7].
After confirming the 480p preview looks good, move on to the final 1080p render. On average, a full video generation takes around 62.01 seconds [6]. Once your preview is ready, review it carefully to make any necessary adjustments.
How to Review and Refine Video Outputs
When reviewing your video, go through it twice. First, check for motion stability, ensuring smooth transitions. Then, focus on prompt accuracy - did the model execute your camera instructions and actions as intended?
As outlined in the configuration guide, maintaining consistency is crucial. Lock your seed to preserve uniformity and adjust only one parameter at a time [1][7]. Start with tweaks to your prompt or camera cues, then fine-tune settings like resolution or duration if needed.
Common Errors and How to Fix Them
If you encounter issues, here’s a quick troubleshooting guide to help you resolve them efficiently:
| Failure Type | Visual Indicator | Fix |
|---|---|---|
| Jittery Motion | Subject shakes between frames | Simplify camera movement in the prompt [1] |
| Subject Drift | Character changes shape across frames | Use a fixed first frame (I2V mode) and lock the seed [1] |
| Unnatural Angles | Erroneous tilts or cuts | Define one clear camera move, like "slow dolly forward" [1] |
| Visual Artifacts | Blurring or melting textures | Use a sharper input image and reduce motion intensity [7] |
| Prompt Confusion | Model ignores action instructions | Keep prompts concise - under 250 words - and focus on one action verb [9] |
A key tip: focus on describing what you want in the scene. Avoid phrases like "no glitches" or "no distortion" as these can unintentionally cause the very issues you’re trying to avoid [11]. Use clear, positive, and descriptive language for the best results.
Integrating Seedance 1.0 Pro with APIMart Workflows
After refining your video output, the next logical step is to connect Seedance 1.0 Pro to your production pipeline using APIMart's API. This connection streamlines automation, links models, and enables scalable video generation.
How to Set Up API Requests for Seedance 1.0 Pro
To get started, include your API key in the request header as Authorization: Bearer YOUR_API_KEY. For security, store the key in an environment variable.
Video generation requests are sent as a POST to https://api.apimart.ai/v1/videos/generations. You’ll work with two model identifiers: doubao-seedance-1-0-pro-fast for speed-focused iterations and doubao-seedance-1-0-pro-quality for high-resolution outputs. Core parameters for the request body include the following:
| Parameter | Type | Description |
|---|---|---|
model | string | Choose between doubao-seedance-1-0-pro-fast or doubao-seedance-1-0-pro-quality. |
prompt | string | Describe the scene, actions, and style. |
duration | integer | Specify clip length in seconds (2–12); defaults to 5. |
aspect_ratio | string | Options: 16:9, 9:16, 1:1, 4:3, 3:4, or 21:9. |
resolution | string | Options: 480p, 720p, or 1080p. |
seed | integer | Use for consistent output across iterations. |
image_with_roles | array | Assigns first_frame or last_frame (available only in the Quality model). |
Since video generation is asynchronous, your initial request will return a task ID instead of the video itself. Use the "Get Task Status" endpoint to poll for updates every 10–15 seconds until the status changes to completed. With APIMart's 99.9% SLA [8], timeouts are rare, but it’s wise to set a maximum polling duration of 600 seconds.
"The API documentation is very detailed, and integration with Doubao Seedance 1.0 Pro Fast went smoothly. We integrated it into our internal CMS, allowing the editorial team to generate accompanying videos directly." - David Kim, Lead Developer [8]
This setup creates a solid foundation for incorporating Seedance 1.0 Pro into larger, multi-modal workflows.
Building Multi-Modal Workflows with APIMart
Once your API setup is complete, you can start chaining models to create versatile multi-modal workflows.
For example, you can pair Seedance 1.0 Pro with an image generation model to enhance your creative process. A common approach is to generate a high-resolution image for the first frame, then use the image URL in the image_with_roles parameter as the first_frame for animation. To avoid distortion, ensure the image’s aspect ratio matches the one specified for the Seedance video.
By keeping each stage - such as image generation, video creation, and post-production - modular, debugging becomes more manageable if issues arise.
To manage costs during development, test your workflow using doubao-seedance-1-0-pro-fast at 480p, which costs $0.0088 per second. Once you’re confident in the results, switch to doubao-seedance-1-0-pro-quality at 1080p for final renders, which costs $0.104 per second. Validating motion and framing with the lower-cost option first is a smart way to stay within budget while ensuring quality.
Conclusion and Key Takeaways
Getting top-tier results with Seedance 1.0 Pro comes down to following a clear, repeatable workflow. Start with well-structured, directive prompts, carefully configure your settings, and always validate motion at 480p before committing to a full 1080p render. By testing at lower resolutions, tweaking parameters, locking the seed, and then rendering in high definition, you can save both time and credits while ensuring professional-quality outcomes.
When crafting prompts, think like a filmmaker. Specify details such as subjects, actions, and precise camera movements - terms like "dolly forward" or "tracking shot" can make a big difference. Using clear subject focus and sequential labels helps maintain visual consistency, especially during transitions.
"Seedance 1.0 Pro focuses on temporal stability, delivering sequences that feel controlled and intentional rather than chaotic or jittery." - Segmind API Guide [7]
On the technical side, don’t overlook the power of locking the seed. This feature ensures that scaling your video to higher resolutions doesn’t compromise composition. For image-to-video transformations, always match the input image’s aspect ratio with your target video settings to avoid any distortion.
For larger-scale projects, consider integrating Seedance 1.0 Pro with APIMart’s unified API and modular workflows. This allows you to build efficient, multi-model pipelines. You can also integrate Kling V3 for cinematic quality into your production workflow. Start by testing with Seedance 1.0 Pro Fast at $0.0088 per second, then finalize high-quality renders using Seedance 1.0 Pro Quality at $0.104 per second for 1080p [8]. This step-by-step method streamlines production and reduces unnecessary trial and error.
FAQs
How do I keep characters consistent across multiple clips?
To keep character identity consistent in Seedance 1.0 Pro, begin with a high-quality reference image for the first frame. This image should clearly define key traits like the character's identity, framing, and overall style. When creating prompts, make sure to consistently include details such as hair, clothing, and age to maintain continuity. Adding specific style elements - like lighting and mood - can also help ensure a cohesive look throughout. Steer clear of cluttered or low-contrast reference images, as they can compromise clarity and focus.
What settings help reduce jittery or unstable motion?
To reduce jittery or unstable motion, focus on using specific motion descriptors rather than relying on static visuals. Break motion into distinct layers to ensure smoother transitions and avoid abrupt jumps. Clearly define camera actions with straightforward instructions, such as panning or tracking.
Keep the frame rate consistent throughout the process, and once you’ve achieved the desired motion, lock the seed to maintain stability. Avoid using conflicting motion prompts, as they can disrupt the flow. Starting with a clear, high-contrast image is also crucial to prevent motion drift and ensure smoother results.
How can I estimate total cost before generating videos?
To figure out costs in Seedance 1.0 Pro, you can use this formula:
Tokens = (Width × Height × Frame Rate × Duration) ÷ 1024
Once you have the total tokens, multiply that number by $2.50 per million tokens to calculate the cost.
Keep in mind, costs increase with higher resolution, frame rates, and longer durations. For a budget-friendly option, try the Pro Fast model or test in draft mode, which can cut costs by roughly 40% per clip.
Choose the model you want in the model marketplace
Try chat, image and video models in the APIMart model marketplace, and experience model capabilities quickly with one unified API.