
Vidu MoE API Guide: Mixture-of-Experts Video
A developer guide to the Vidu MoE (Vidu Q3) video API: model tiers, request structure, parameters, pricing, and async submit-poll-download workflow on APIMart.
If I had to sum this up in one line: Vidu MoE is a short-form video API for teams that need 1–16 second clips, up to 1080p, 24 fps, async delivery, and optional audio in one request.
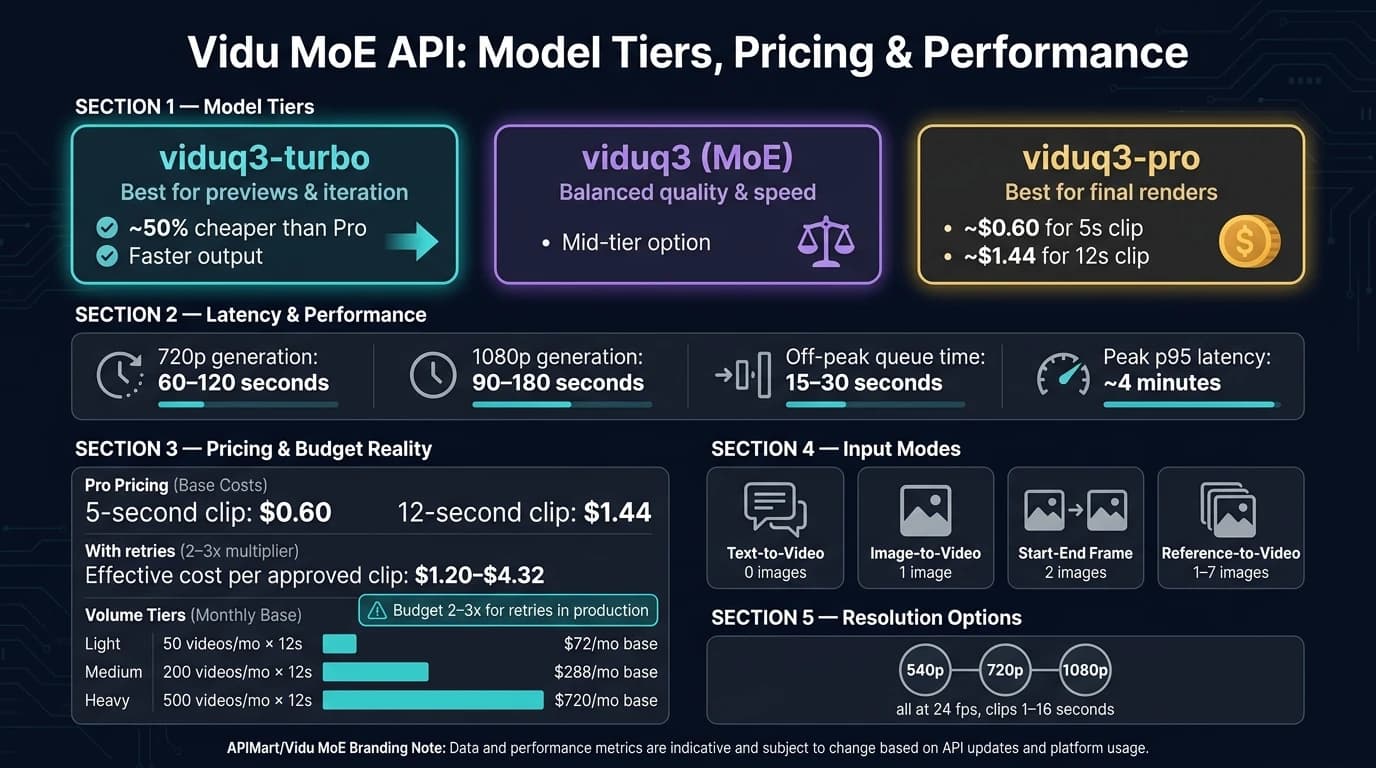
If you’re judging fit for production, here’s the short answer: it works best when you can handle async jobs, budget for retries, and choose the right model tier for each stage. I’d use viduq3-turbo for previews and viduq3-pro for final output. Most jobs finish in about 60–120 seconds at 720p and 90–180 seconds at 1080p, with peak wait times reaching about 4 minutes.
Here’s what matters most:
- Input modes: text-to-video, one-image animation, Grok Imagine Video alternatives, two-frame start/end video, and multi-image reference input
- Clip limits: 1 to 16 seconds
- Output: up to 1080p at 24 fps
- Audio: can be turned on in the same request
- Image references: up to 7 images in the broader model feature set
- Main API rule: if you send image URLs, don’t send
aspect_ratio - Delivery: async with
task_id, polling, or callback - Pricing example: Pro is about $0.60 for 5 seconds and $1.44 for 12 seconds
- Budget reality: plan for 2–3 attempts per approved clip
A few details stand out. The API uses a simple JSON request with model, prompt, and optional media inputs. The model choice is straightforward: turbo for lower-cost testing, pro for higher-end renders. Seed control helps you keep outputs in a similar direction across retries, though not as exact matches.
If I were evaluating this for a product team, I’d focus on three questions:
- Can my app handle async processing cleanly?
- Do I need prompt-only generation, image-led control, or start/end frame control?
- Does my budget still work after retries, not just first-pass cost?
Quick comparison
| Item | What to know |
|---|---|
| Best for | Marketing clips, product videos, explainers, ad variants |
| Model choices | viduq3-turbo, viduq3-pro, viduq3 |
| Input control | Prompt only, 1 image, 2 images, or reference-led generation |
| Latency | Usually 1–3 minutes, sometimes longer at peak |
| Resolution | 540p, 720p, 1080p |
| Audio | Supported in-request |
| Workflow fit | Teams that can wait a few minutes and store files after completion |
| Watch-outs | Expiring output URLs, retry costs, and request errors from bad parameter combos |
So before you read the full guide, the takeaway is simple: Vidu MoE is a good fit for short API-based video generation when you want several input modes, built-in audio, and control over cost by switching between turbo and pro. The rest comes down to request setup, status handling, and picking the input method that matches your workflow.
Vidu MoE API Overview and Core Capabilities
At the API level, Vidu MoE maps to a small set of model names, workflows, and output fields.
Vidu MoE shows up in the API as viduq3-mix, the balanced Q3 model. viduq3-turbo leans toward speed, while viduq3-pro leans toward more detail.
What Mixture-of-Experts Means in Video Generation
Mixture-of-experts sends different parts of the generation process to specialized components. In practice, that helps with motion, scene composition, and sticking to the prompt.
The Q3 series also supports intelligent scene switching and intelligent camera switching [2][4]. That matters most in multi-shot sequences, where continuity can fall apart fast if the model loses track of the scene.
Supported Workflows: Text-to-Video, Image-to-Video, and Reference-Guided Generation
From there, the main difference comes down to the input type you send.
viduq3-mix supports four workflows:
- Text-to-Video from a prompt alone
- Image-to-Video from one start image
- Reference-to-Video from 1 to 7 images for appearance and style consistency
- Start-End to Video from two frames that define the transition
Prompts support up to 5,000 characters [3][4]. viduq3-mix does not support the Subjects entity library.
Inputs and Outputs at a Glance
| Workflow | Typical Input Fields | Returned Fields |
|---|---|---|
| Text-to-Video | model, prompt, duration, aspect_ratio, audio | task_id, state, credits, video_url |
| Image-to-Video | model, images (1 start frame), prompt, audio | task_id, state, credits, video_url |
| Reference-to-Video | model, images (1–7), prompt, audio | task_id, state, credits, video_url |
| Start-End to Video | model, images (2 frames), prompt, resolution | task_id, state, credits, video_url |
Each job returns a task_id and state, and the final video_url becomes available after processing.
Q3 videos run at 24 fps, support durations from 1 to 16 seconds (comparable to Sora 2 capabilities), and offer 540p, 720p, or 1080p output [2]. Image inputs are limited to 50 MB per file [4][1].
These workflow options shape the payload you send next, which the following section breaks down into authentication and request format.
Authentication, Request Structure, and APIMart Setup
To generate Vidu MoE videos, you need to send an authenticated JSON request. The request body depends on the input mode: text-only, single-image, or multi-image.
Getting API Credentials and Setting Request Headers
Generate your API key from the APIMart API Key Management Page [6]. Save it as APIMART_API_KEY, then load it at runtime with os.environ.get("APIMART_API_KEY") in Python or process.env.APIMART_API_KEY in Node.js.
Include these headers with every request:
Authorization: Bearer YOUR_API_KEYContent-Type: application/json
Minimum Request Payload for a Video Generation Job
The standard APIMart endpoint for Vidu Q3 (MoE) generations is https://api.apimart.ai/v1/videos/generations [6]. The API figures out the mode from image_urls:
0URLs = text-to-video1URL = image-to-video2URLs = first-to-last frame
Here are the core fields and when to use them [6]:
| Parameter | Required | Default | Notes |
|---|---|---|---|
model | Yes | - | viduq3-pro, viduq3-turbo, or viduq3 |
prompt | Conditional | - | Required for text-to-video; max 2,000 characters |
image_urls | Conditional | - | Required for image-to-video (1 URL) or first-to-last frame (2 URLs) |
duration | No | 5 sec | Range: 1–16 seconds |
resolution | No | 720p | Options: 540p, 720p, 1080p |
aspect_ratio | No | 16:9 | Text-to-video only; omit when providing image_urls |
audio | No | true | Set to false for a silent video |
seed | No | - | Integer from -1 to 2^32-1 for reproducibility |
One easy mistake here: do not send aspect_ratio with image_urls. When you include images, the API pulls the aspect ratio from the source image. If you send aspect_ratio anyway, the request returns a 400 error.
Once the payload is set, you can submit the job and start polling for the result.
Example API Call and Response Pattern
Example text-to-video request:
curl -X POST https://api.apimart.ai/v1/videos/generations \
  -H "Authorization: Bearer $APIMART_API_KEY" \
  -H "Content-Type: application/json" \
  -d '{
    "model": "viduq3-turbo",
    "prompt": "A product shot of a glass perfume bottle on a marble surface, camera slowly zooms in, soft studio lighting",
    "duration": 5,
    "resolution": "720p",
    "aspect_ratio": "16:9",
    "audio": false
  }'
A successful submission returns a task_id and submitted status [6]:
{
  "code": 200,
  "data": [{
    "status": "submitted",
    "task_id": "task_xxxxxxxxxx"
  }]
}
The API runs asynchronously. That means the first response only tells you the job was accepted. Use the task_id to poll the "Get Task Status" endpoint. When the job finishes, the response includes MP4 link(s), usually valid for 7 days [6].
A simple polling rhythm works well:
- Poll every 5 seconds for the first 5 minutes
- After that, poll once per minute
- Keep polling until the status is
completed
At that point, download and store the returned video link(s).
Next, tune duration, resolution, aspect ratio, and reference inputs to control the final video. For projects requiring different cinematic styles, you can also compare Kling V3 capabilities for high-end video generation.
Generation Workflow, Parameters, and Output Control
End-to-End Flow: Submit, Monitor, Retrieve, and Store Results
After you submit a job, the big production decision is simple: use a callback or poll for status. In most cases, callback_url is the better pick for production. Polling works, but it should be your backup plan. When you use a callback, the API sends the final status to your endpoint. If delivery fails, it retries up to three times [3].
The job then moves through a fixed status path: created → queueing → processing → success or failed [3][4]. If a task lands in failed, the response includes an error code. Log that code and handle it in your workflow so your team can spot patterns and fix problems faster.
When the status hits success, download the output right away and save it to durable storage. That step matters because API-hosted URLs can expire [9].
Key Parameters That Affect Composition, Motion, Duration, and Consistency
Once a job is in motion, a few parameters shape how the result looks, how steady it stays from run to run, and how many credits you spend.
| Parameter | What It Controls | Visual / Quality Effect | Cost Impact |
|---|---|---|---|
seed | Randomization | Reuse the same seed with the same prompt to reproduce similar motion and composition | No direct cost impact [3][6] |
off_peak | Job scheduling | No visual impact; routes low-priority jobs to off-peak processing | Can reduce credit consumption; may delay completion by up to 48 hours [11] |
audio_type | Sound layer | Choose Speech_only, Sound-effect_only, or All (similar to audio support in kling-v2-6) | No extra charge for standard audio options [1][4] |
is_rec | AI prompt enhancement | Improves prompt-image alignment when manual prompting produces inconsistent results | Costs 10 extra credits per task [1] |
One parameter is worth tracking from the start: seed. If you get a motion pattern you like, record that integer and keep it. Then, when you adjust the prompt later, you can reuse the same seed to hold onto a similar overall composition instead of starting from scratch.
When to Use Prompts Only, Image References, or Both
These input modes let you trade speed for control. Pick the one that matches how locked-in your visual direction is.
- Prompt-only (text-to-video): Best for early ideation, style tests, and scene experiments before visual assets are finalized. Use
viduq3-turboat 540p or 720p to keep iteration costs lower, or compare it with WAN 2.6 for high-consistency alternatives [7]. - Single image (image-to-video): Best when you want to animate something specific, like a product photo, character illustration, or brand visual. This is a strong fit for e-commerce and marketing work.
- Two images (first-to-last frame): Best when the transition needs to land on a set result, like a product turning to a certain angle or a character moving into a defined pose [5].
If manual prompting gives you uneven results, turn on is_rec: true. The API will generate an optimized prompt from your image, which can help image-prompt alignment, but it adds 10 credits per task [1].
Performance, Pricing, and Real Integration Scenarios
How to Evaluate Latency, Reliability, and Cost Per Video
After you lock in the request format, the next thing to look at is speed, price, and job success rate. This is an async workflow, so your app should submit the job, store the task_id, and fetch the final MP4 later through polling or a callback [3][6].
Jobs usually move through a simple path: queued, complete, or failed. When a job fails, credits are often refunded automatically [3][10]. That matters in production, because retries are part of the process, not some edge case.
In terms of turnaround time, 720p generations usually finish in 60–120 seconds. For 1080p, expect more like 90–180 seconds. Queue time is often 15–30 seconds during off-peak hours, while peak p95 latency can stretch to about 4 minutes [7]. So yes, it can work well in production - but only if your system is built to handle async completion cleanly.
On pricing, the Pro rate puts a 5-second clip at $0.60 and a 12-second clip at $1.44 [10]. In practice, most teams should budget for 2–3 tries per approved asset. That puts the final cost for a usable clip in the $1.20–$4.32 range, depending on length [10]. If you’re in testing mode, viduq3-turbo is about half the price of Pro and makes more sense for fast iteration. Pro is better saved for final renders [10].
| Volume Tier | Monthly Videos | Avg. Duration | Base Monthly Cost (USD) |
|---|---|---|---|
| Light | 50 | 12s | $72.00 |
| Medium | 200 | 12s | $288.00 |
| Heavy | 500 | 12s | $720.00 |
These numbers cover base generation only. They do not include retries. If your team expects multiple passes - and most do - multiply the totals by 2–3 for a budget that’s closer to day-to-day production.
Use Cases: Marketing Videos, Educational Clips, and E-Commerce Product Visuals
Once cost and wait time are clear, the next step is picking the right input mode for the asset you need to ship. The best choice mostly comes down to one thing: how much visual control you already have.
| Scenario | Recommended Input Type | Output Expectations | Operational Notes |
|---|---|---|---|
| Marketing Creatives | Reference-to-Video | Consistent brand avatars or mascots across clips | Pass character and background references together for visual consistency. |
| E-Commerce Visuals | Image-to-Video | Consistent product appearance | Start with a single high-quality catalog image; output quality tracks the input frame. |
| Educational Clips | First-Last Frame | Smooth transitions between states | Provide a start image and an end image to guide the motion. |
| Social Media Ads | Text-to-Video | Vertical (9:16) or square (1:1) clips | Use short vertical or square prompts for rapid ad variants. |
A simple way to think about it:
- If brand consistency matters, use Reference-to-Video
- If the source image already looks good, use Image-to-Video
- If you need motion between two states, use First-Last Frame
- If you want lots of ad variants fast, use Text-to-Video or consider MiniMax Hailuo 2.3 for high-consistency professional outputs.
For teams trying to trim editing time, native audio changes the workflow the most. Native audio cuts separate sourcing and editing work [8], which can remove extra post-production steps for teams that want a finished clip from a single generation pass. That’s where the model becomes most useful: when the goal is to get close to a ship-ready asset without bouncing the file through a long handoff chain.
Conclusion: How to Decide If Vidu MoE Fits Your Production Workflow
Vidu MoE makes sense when you need short clips up to 12–16 seconds, several input modes, and native audio in an async API setup. The seed parameter can help keep repeated jobs moving in roughly the same direction, but you should not expect identical inputs to produce bit-for-bit matching outputs [6][10]. Failed jobs also tend to trigger automatic credit refunds [3][10].
This fits teams that produce short-form video at scale, can wait a few minutes for results, and have room in the budget for retries. If that sounds like your workflow, APIMart gives you a clean way to run marketing creatives, product visuals, and explainer content through one API surface.
FAQs
Which Vidu MoE model should I use first?
For most developers, viduq3-turbo is the best place to start. It gives you the fastest generation speeds, a strong price-to-performance ratio, and advanced features like audio-visual synchronization and intelligent scene switching.
Go with viduq3-pro if you want the most complete feature set. It includes storyboard generation and the highest-quality audio-visual alignment. Both models support videos from 1 to 16 seconds and resolutions up to 1080p.
How should I handle failed or delayed video jobs?
Use the task ID in your async workflow.
For jobs that take longer, either poll the status API from time to time or set a callback URL so you get notified when the task hits a terminal state.
If a job fails, check the callback or status response for error details.
For production stability, use exponential backoff when polling so you don't run into rate limits.
Off-peak tasks that run past 48 hours are canceled automatically, and the points are refunded.
What input mode offers the most control?
Multi-Frame Generation gives you the most control over how a video moves from one moment to the next. Instead of relying on one prompt or a two-frame setup, you can map out a sequence of up to 9 key frames.
That extra control matters. For each transition, you can add a specific image and a custom prompt, so the visual story follows the path you want, frame by frame.
To use it, send your images and prompts to the multiframe endpoint in the image_settings array.