How to Use Pixverse V6: Beginner's Guide
A beginner's guide to Pixverse V6: set up your account, write strong prompts, configure resolution and audio, and create your first AI video on APIMart.
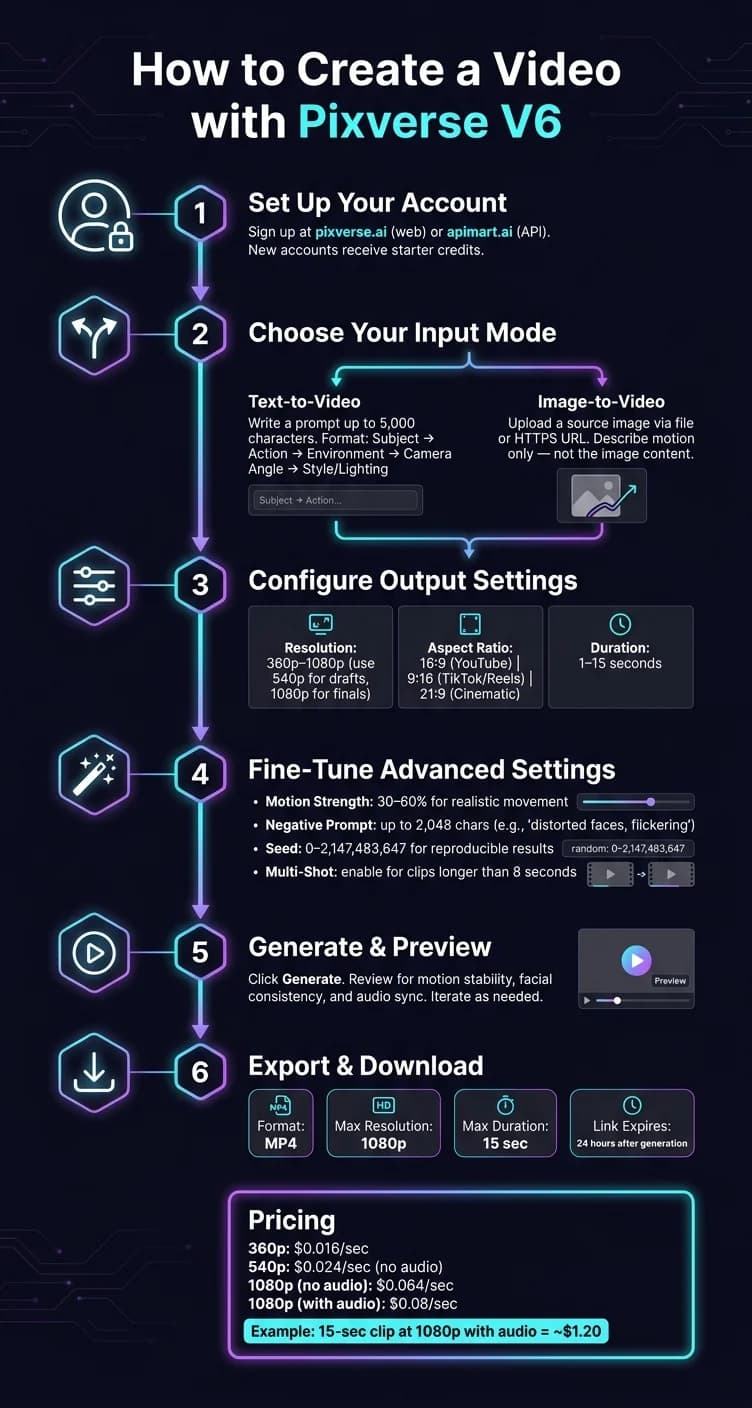
Pixverse V6 is an AI-powered video generation tool designed for creating high-quality, short-form videos (up to 15 seconds) using text prompts or images. It offers Full HD resolution (1080p), multiple aspect ratios (16:9, 9:16, 21:9), and synchronized audio capabilities like ambient sounds or music. Whether you're a developer or a beginner, Pixverse V6 simplifies video creation through its web dashboard or API integration. Here's what you need to know:
- Inputs: Use text prompts (up to 5,000 characters) or source images for consistent visuals. For even higher consistency, consider MiniMax Hailuo 2.3.
- Outputs: Choose resolution (360p–1080p), aspect ratio, and duration (1–15 seconds).
- Pricing: Costs vary by resolution and audio inclusion (e.g., $0.08/sec for 1080p with audio).
- Features: Supports cinematic camera controls, multi-shot consistency, and negative prompts to refine results.
- Workflow: Start with drafts at lower resolutions to save costs, then finalize in 1080p.
Pixverse V6 is ideal for marketers, social media managers, and developers looking to produce professional-quality videos efficiently.
Getting Ready to Use Pixverse V6
Account Setup and Access
To get started, head over to pixverse.ai and create a free account using your email, or log in with Google, Apple, or Discord. New accounts come with starter credits, giving you a chance to explore the platform before upgrading to a paid plan.
If you're a developer planning to integrate Pixverse V6 into your tools or workflows, you'll need to register at apimart.ai instead. Once registered, you can generate an API key (Bearer Token) to authenticate your requests through APIMart's unified endpoint. As Daniel Park, a Product Engineer, explains:
"The PixVerse V6 API page makes the PixVerse V6 request structure clear for developers. Model, prompt, duration, resolution, and size are straightforward to wire up." - Daniel Park, Product Engineer [1]
After logging into the PixVerse web dashboard, go to the Create panel and select V6 from the model dropdown menu. The dashboard also features a project library for reviewing your previous outputs and a community gallery for prompt ideas. From here, you can start preparing your inputs for video generation.
Preparing Your Project Inputs
Before creating your video, you'll need to set up your inputs. Pixverse V6 works with two main input types: text prompts and source images. The choice between these depends on your creative goals.
- Text Prompts: You can use up to 5,000 characters to describe your scene. The best prompts follow a structured format: Subject → Action → Environment → Camera angle → Style/Lighting. For example: "A female warrior in silver armor, raising her sword, standing in a misty battlefield at dawn, low-angle tracking shot, dramatic backlighting." If there are elements you want to avoid, you can include a negative prompt (up to 2,048 characters) to exclude things like blurry motion or watermarks.
- Source Images: If you're aiming for visual consistency - like keeping a character or product's appearance uniform - use a source image. The Image-to-Video mode uses this visual reference to produce more consistent results compared to text prompts alone. For API users, ensure your images are hosted on publicly accessible HTTP/HTTPS URLs, as base64 and Data URIs aren't supported.
Next, configure your output settings. Choose the aspect ratio, resolution (360p–1080p), and duration (1–15 seconds) based on your video's intended use. For example:
- 16:9 works well for YouTube or presentations.
- 9:16 is ideal for TikTok or Instagram Reels.
- 21:9 gives your video a cinematic feel.
If you'd like to include AI-generated ambient audio, such as background music or crowd noise, be sure to toggle this option on - it will impact the pricing.
| Format | Aspect Ratio | Best For |
|---|---|---|
| Widescreen | 16:9 | YouTube, presentations, ads |
| Vertical | 9:16 | TikTok, Instagram Reels, Shorts |
| Square | 1:1 | Social media posts |
| Cinematic | 21:9 | Film-style content, trailers |
Once your account, inputs, and output settings are ready, you're all set to start creating with Pixverse V6!
BEST for Beginners: AI Image to Video Generator | PixVerse AI Tutorial
How to Create a Video with Pixverse V6
Now that your account is set up and your inputs are ready, let's dive into creating your first video. These steps build on the configurations you've already established.
Starting a Text-to-Video Project
To get started, head to the Create panel and ensure V6 is selected as your model. This model supports videos up to 15 seconds long, in 1080p resolution, with integrated audio.
-
Enter your prompt
Use the Subject → Action → Environment → Camera angle → Style/Lighting format for your prompt. For example: "A barista pouring latte art, slow-motion close-up, warm café interior, shallow depth of field, golden hour lighting." To fine-tune the AI's camera work, include terms like "dolly in", "tracking shot," or "low angle" - specific cinematic directions can make a big difference. -
Configure your output settings
Choose 1080p resolution, set your aspect ratio, and decide on a duration between 1 and 15 seconds. Keep in mind, 1080p costs $0.064/sec without audio and $0.08/sec with audio [1]. If you're experimenting, try 360p first (costing $0.016/sec) to save credits before going for full quality. -
Generate the video
Hit Generate and let the system work its magic. Treat the result as a draft - adjust your prompt or settings if needed. As the PixVerse Creator Handbook explains:"V6 - The flagship model for general-purpose video generation. 15-second duration, 1080p resolution, integrated audio, multi-shot support, and full camera controls." [6]
Starting an Image-to-Video Project
The Image-to-Video (I2V) feature lets you animate an existing image rather than creating an entirely new scene. This is ideal when you need continuity in characters, products, or settings across multiple clips.
To begin, switch to Image-to-Video mode in the Create panel. Upload your image - either as a local file or via a publicly accessible HTTPS URL. After the upload, focus your prompt on describing the motion you want, not the image itself. For instance, if your image features a woman standing on a city street, your prompt might say: "She slowly turns to face the camera, wind gently moving her hair." Avoid re-describing elements already visible in the image - this is a common mistake for I2V beginners.
Then, adjust the motion strength. A range of 30–60% works best - enough to create noticeable movement without distorting details like faces or textures. Confirm the resolution and duration as you did earlier, and click Generate. Note that I2V mode retains the aspect ratio of the uploaded image [4].
"PixVerse V6 gives our creative team a fast way to quickly test cinematic scenes before production. The APIMart workflow is easy to automate." - Alex Morgan, Creative Technologist [1]
Once your video is ready, download it promptly, as links expire after 24 hours [1].
With your video completed, you're ready to move on to reviewing and refining the output in the next steps.
Adjusting Pixverse V6 Settings for Better Output
Key V6 Settings Explained
Once your video draft is ready, fine-tuning the settings can significantly enhance its quality. Beyond the initial setup, these adjustments allow you to refine both the creative and technical elements, ensuring your video meets your vision.
| Setting | Effect on Output | Recommended Use Case |
|---|---|---|
| Resolution | Impacts visual clarity and detail | Use 540p for drafts; switch to 1080p for final production |
| Aspect Ratio | Determines framing and platform fit | 16:9 for YouTube; 9:16 for TikTok/Reels; 21:9 for cinema |
| Duration | Controls clip length (1–15 seconds) | 5–8 seconds for social media; 15 seconds for detailed narratives |
| Motion Strength | Adjusts movement intensity | 30–60% for smooth and realistic motion |
| Multi-Shot | Maintains consistency across scenes | Ideal for longer clips to ensure continuity |
| Negative Prompt | Excludes unwanted elements | Removes issues like distorted faces or flickering |
| Seed | Ensures reproducibility | Set a value (0–2,147,483,647) to test and refine prompts |
Locking the seed value is particularly useful when experimenting with different prompts. It allows you to reproduce results consistently, helping you identify what works best [2].
For projects longer than 8 seconds, Multi-Shot mode is a game-changer. It enables smooth transitions between wide, medium, and close-up shots while preserving character and environment consistency. However, for shorter clips (under 8 seconds), this setting might not be necessary, as transitions can feel too abrupt [8].
Tips for Getting Better Results
To truly make the most of Pixverse V6, focus on crafting high-quality prompts. As Tonny Franzen wisely puts it:
"A weak prompt leads to weak results, no matter how good the tool is." - Tonny Franzen [3]
Using cinematic language in your prompts can elevate your video's quality. Structure them in a clear format: Subject → Action → Environment → Camera Language → Style/Lighting. Incorporating terms like "crane shot", "shallow depth of field", or "dramatic backlighting" helps Pixverse V6 better understand and execute your creative vision.
For efficient workflow, start by testing your video at 540p resolution with a 5-second duration. This allows you to validate the composition without incurring high costs. Once satisfied, switch to 1080p resolution and extend to 15 seconds for the final production [8].
Don't underestimate the power of the negative prompt field, which supports up to 2,048 characters. Use it to eliminate common issues by adding phrases like "distorted faces, flickering, extra fingers." This step is especially critical for close-ups or detailed shots [9].
Finally, remember Franzen's advice:
"The best results always come from iteration, not a single attempt." - Tonny Franzen [3]
Reviewing, Refining, and Exporting Your Video
How to Preview and Edit Your Video
Once you click Generate, your video clip will appear in the workspace within seconds or a few minutes. During the preview phase, focus on motion stability, facial consistency, and scene clarity. These are the key areas to check for any noticeable issues. For example, if you notice a face looks distorted or an object moves in an unnatural way, try reducing the motion strength to somewhere between 30–60% or simplify your camera instructions [3]. If a character’s appearance changes inconsistently between frames, consider switching from Text-to-Video mode to Image-to-Video mode. Providing a single, clear reference image can help maintain the character's look across frames [9]. For even higher consistency, models like MiniMax Hailuo 02 offer advanced image-to-video capabilities.
Additionally, always check the audio sync to ensure that the sound aligns properly with the visuals before moving on to the export phase [5].
"Don't worry about crafting the perfect prompt - iteration is part of the process." - PixVerse Creator Handbook [6]
Once you're happy with how everything looks and sounds during the preview, you can move forward to export the finalized video.
How to Export the Final Video
After completing your adjustments, it's time to export. The recommended format for most platforms like TikTok, Instagram Reels, and YouTube Shorts is MP4 [5]. For the best quality, set the resolution to 1080p, which is the maximum supported. If your draft was rendered at a lower resolution, such as 540p, you can use the upscale feature to improve the quality before downloading [7].
Keep in mind that video links are temporary and expire 24 hours after generation [2]. To avoid losing your work, download or transfer your files promptly. If you're using the API, automate the download process to ensure everything is saved in time. As noted in the APIMart Documentation:
"Video links typically expire after 24 hours; download or transfer them in time." - APIMart Documentation [2]
Here’s a quick summary of the export specifications:
| Export Detail | Specification |
|---|---|
| Output Format | MP4 |
| Max Resolution | 1080p |
| Max Duration | 15 seconds |
| Default Resolution | 540p |
| Link Expiration | 24 hours after generation |
| Watermark | Optional (toggle on/off) |
To manage costs effectively, validate your video at a lower resolution like 540p before exporting in 1080p. For instance, exporting a 15-second clip at 1080p with audio costs $0.08 per second, totaling about $1.20, whereas the same clip at 540p without audio costs just $0.024 per second [1]. Reviewing drafts at lower resolutions can help you save money while ensuring the final product meets your standards.
Conclusion
Choose your mode wisely - whether it's Text-to-Video for quick brainstorming or Image-to-Video for maintaining visual consistency. Start with a well-structured prompt that includes the subject, action, environment, camera movement, and style. Then, fine-tune your settings or use an AI canvas editor for the best results. Small adjustments can make a big difference: keep motion strength between 30–60%, use precise cinematic terms like "85mm lens" or "golden hour lighting", and view your first generation as a draft to refine further. As Tonny Franzen aptly said:
"Learning how to use PixVerse effectively is less about mastering the tool itself and more about understanding how to communicate visually." [3]
Once you've nailed the basics, you can dive into Pixverse V6's more advanced features. Experiment with Multi-reference Fusion to ensure character consistency by blending up to seven reference images. Try Video Extension to seamlessly continue a narrative, or incorporate multi-shot prompting with "CUT TO:" cues to create dynamic sequences. These advanced techniques take your projects to the next level. For even higher fidelity, you might explore professional video models like WAN 2.7.
The rapid rise of Pixverse V6 showcases its shift from an experimental AI tool to a core resource for production. Whether you're crafting social media content, testing ideas for a campaign, or prototyping a short film, this workflow is designed to grow with your creative ambitions.
FAQs
How do I pick the best aspect ratio for my video?
When selecting an aspect ratio in Pixverse V6, it's important to match it to your platform or project requirements:
- 9:16: Perfect for vertical content, like TikTok or Instagram Reels.
- 16:9: Ideal for widescreen formats, such as YouTube or landscape videos.
- 21:9: Great for achieving a cinematic feel.
You can also explore other ratios like 1:1 or 4:3 for specific artistic purposes. Keep in mind, this setting is relevant only in text-to-video or multi-reference fusion modes.
What prompt details improve camera motion and realism?
To bring more dynamic and realistic camera motion to Pixverse V6, try incorporating specific instructions like slow pan, tracking shot, close-up, or drone pull-back. These techniques can help create a cinematic feel. For added realism, include optical details such as lens specifications (e.g., an 85mm lens) and aperture settings to achieve a natural depth of field.
Keep the motion strength in a moderate range - around 30% to 60% - to maintain smoothness and avoid any visual distortion. To further improve quality, use negative prompts like blurry or shaky, ensuring the final visuals remain polished and professional.
How can I keep a character consistent across clips?
To keep your character consistent in Pixverse V6, start with a detailed master description. This should cover everything from facial features and hairstyle to wardrobe choices. Think of it as your character's blueprint, ensuring their look stays the same across all prompts.
Pair this description with a clear portrait reference image. This visual guide acts as a foundation for the AI. Also, make sure to enable the multi-shot generation feature (generate_multi_clip_switch: true). This helps maintain consistency when generating multiple scenes.
Lastly, use negative prompts to filter out traits or elements you don’t want. This step is crucial for keeping your character’s appearance aligned with your vision throughout the process.