
Ultimate Guide to AI Storyboard Generators
A practical guide to AI storyboard generators — how they work, key controls to check, multi-model pipeline setup, and best practices for consistent boards.
AI storyboard generators cut first-pass planning time from days to hours, and in many cases lower time and cost by 52% while moving approvals 48% faster.
If I were picking one in 2026, I’d focus on four things first:
- Control: character locks, shot-type controls, lens and lighting inputs
- Workflow: script upload, shot breakdown, panel edits, animatic output
- Team use: comments, version history, share links, API access
- Risk: pricing, commercial rights, data retention, and training-use terms
Here’s the simple version: these tools turn scripts, prompts, reference images, and audio into shot-by-shot boards. They help directors, indie teams, ad teams, e-commerce brands, and training groups test scenes before spending more money on production. But image quality alone is not enough. Character drift, weak exports, and unclear license terms can turn a time-saving tool into extra work.
A good setup should let you:
- upload Final Draft, Celtx, Fountain, Markdown, or PDF files
- generate shot lists, storyboard panels, and MP4 animatics
- lock style, lighting, and character look across scenes
- regenerate one panel at a time instead of the whole board
- pass approved boards into video tools with logs for prompts, seeds, and model versions
If I had to sum up the buying checklist in one line, it would be this: pick the tool that fits your production flow, not the one with the prettiest demo image.
How to Make Storyboard with AI
For a more hands-on approach, you can use an AI canvas to generate and edit your visual sequences.
Quick Comparison
| What to check | What I’d look for | Why it matters |
|---|---|---|
| Inputs | Script files, prompts, refs, audio | Better inputs usually lead to better boards |
| Shot control | CU, MS, WS, OTS, POV, lens, lighting | Gives you more control over framing and look |
| Continuity | Character locks, style presets | Helps stop visual drift across frames |
| Editing | Panel-level regen, inpainting | Fixes one weak frame without redoing all panels |
| Exports | PDF, CSV, MP4 | Makes review and handoff easier |
| Team features | Comments, versions, share links | Keeps review rounds moving |
| Pipeline fit | API, webhooks, multi-model support | Connects boards to animatics and final video |
| Risk checks | Rights, privacy, retention, billing | Helps avoid legal and budget problems |
I’ll keep the rest of this guide focused on what matters most: how these tools work, who gets the most from them, what features to check, how to plug them into a multi-model workflow, and what habits lead to better storyboard output.
How AI Storyboard Generators Work
Inputs: Scripts, Prompts, Reference Images, and Audio
Once you know where storyboard generators fit, the next step is understanding what they need to make usable boards.
Most AI storyboard tools can take in several kinds of inputs: uploaded screenplays in formats like Final Draft, Celtx, Fountain, Markdown, or PDF; plain-text scene summaries; single shot prompts; character or brand reference images; and audio files for timing. Put simply, clearer inputs usually lead to cleaner boards.
Character references help keep designs consistent from shot to shot. And when you want control over framing, specific camera language works better than vague mood words. Audio becomes most important for animatics, where timing needs to match pacing.
Workflow: Scene Breakdown, Shot Lists, Frame Generation, and Exports
The workflow usually follows a clear path: ingest the script, extract scene beats, generate a shot list, render frames, refine panels, and export boards or animatics.
An NLP layer reads the script and pulls out characters, settings, time of day, and key actions [7][4]. From there, the system builds a structured shot list and suggests shot sizes like wide shots and close-ups, along with camera moves like pan, dolly, and tilt [8][4]. Layout tools then apply composition rules such as the Rule of Thirds [7]. After that, diffusion models such as Stable Diffusion or Midjourney v7 render the frames [7][4]. Users can then adjust single panels with inpainting and export PDF boards, shot lists, or MP4 animatics [7][6][8][4].
What matters most is simple: the outputs need to be easy to review, edit, and pass to the next stage.
Common Use Cases Across Industries
Ad teams use storyboard generators to compare concepts fast. Animation studios use them for previs and early sequence planning. Indie filmmakers use them to test camera language and pacing before production. The same workflow also works for explainer videos, social ads, game cutscenes, and training content.
Across all of these cases, the big draw is the same: faster visual planning before production starts.
What to Look for When Choosing an AI Storyboard Generator
Once you understand how these tools work, the next step is simpler: figure out which controls make the output usable in actual production.
Creative Controls That Affect Story Quality
One of the biggest problems is visual drift. That’s when a character starts to look different from one frame to the next. It happens a lot. About 57% of creators using AI boards say they run into this when they don’t use dedicated continuity tools [1].
The good news is the fix is pretty simple. Look for tools with character locks or consistency refs. These let you save a portrait or reference image for each main character before you generate the full board. Do that first. Then run the sequence. It can save you a lot of cleanup later.
Character consistency is only part of the story, though. You also want solid control over camera language. Better tools should support standard shot terms like CU, MS, WS, OTS, and POV. They should also let you set more exact technical details, such as lens type, lighting ratios, and depth of field. For example, choosing 35mm vs. anamorphic usually gives you far more predictable output than broad prompts like “dramatic” or “cinematic.” Along the same lines, project-level style presets help keep lighting and color in line across scenes instead of letting each panel wander off on its own.
| Feature | Why It Matters |
|---|---|
| Character Consistency | Keeps the protagonist's appearance stable across 40+ frames [3] |
| Style Presets | Maintains unified lighting and color palette across the entire project |
| Shot Type Selectors | Forces the AI to respect cinematic language (Wide, Close-up, etc.) |
| Panel-Level Regeneration | Fix one frame without rerendering the full board |
Collaboration, Exports, and Production Readiness
It’s not just about image output. You also need to think about how easily the storyboard moves into review and the rest of production.
Good exports matter. So do team features. For shared workflows, the basics are:
- Frame-specific commenting
- Version history
- Secure presentation links clients can open without making an account
A production-ready tool should also export PDF storyboards, CSV shot lists, and MP4 animatics. If your team works across several platforms, API access and webhooks are worth putting near the top of the list because they can sync with project trackers and asset stores [6].
This matters even more now that animatic-first workflows are showing up earlier in the process. More teams are layering boards with voiceover and music sooner, not later [5][2].
Cost, Licensing, Privacy, and Compliance
Before you commit to a tool, check the boring stuff CAREFULLY. That means commercial rights, data retention, training use, and usage-based billing. If you’re uploading scripts or reference assets, you want clear answers before anything touches the system.
With those criteria in place, the next move is fitting the tool into a broader multi-modal pipeline.
How to Integrate AI Storyboard Generators Into a Multi-Modal AI Pipeline
Pipeline Design: From Script Drafting to Animatics and Final Video
Once your boards export cleanly, the next step is to connect script parsing, storyboard generation, animatics, and final video into one workflow.
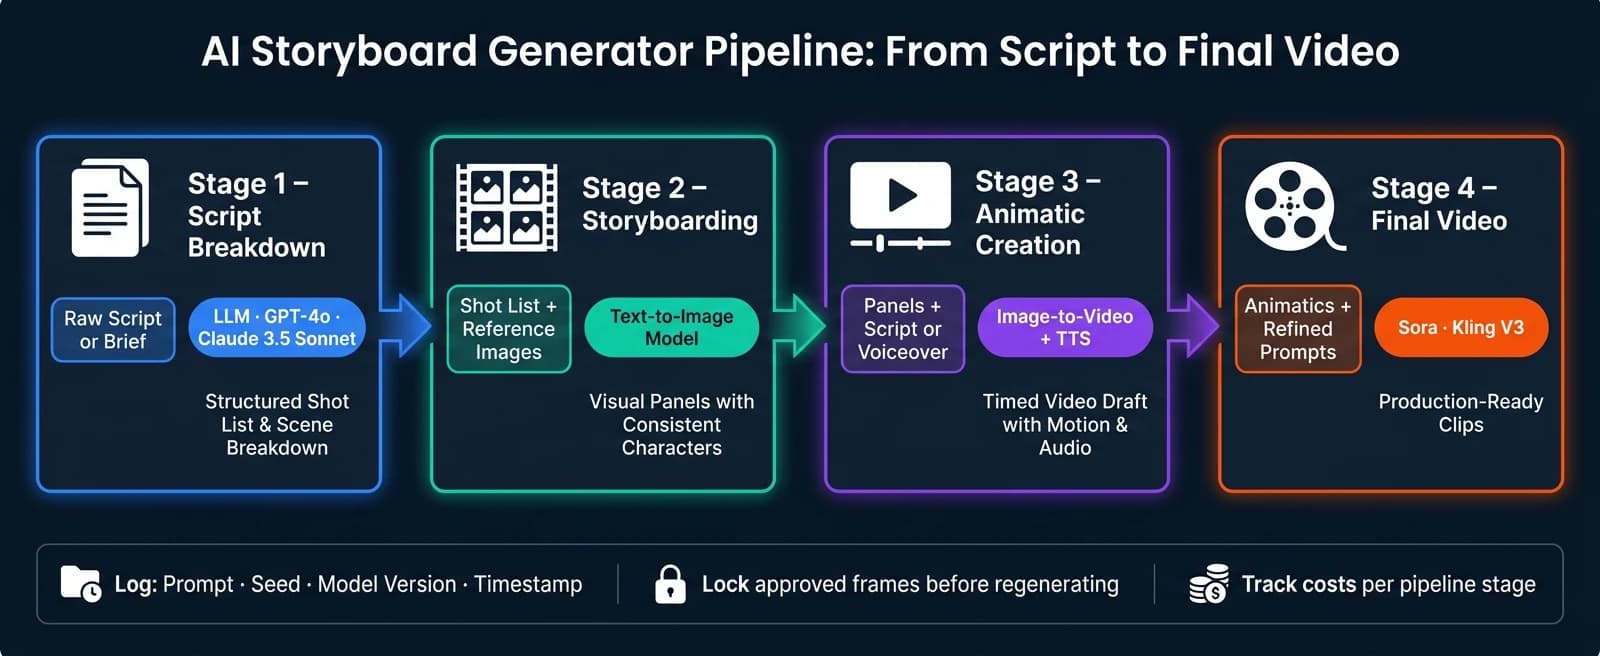
A common setup starts with an LLM that turns a raw script into a structured scene list and shot breakdown. From there, the pipeline moves into storyboard panel generation, then animatic assembly, and finally into full video production. The goal is simple: move from rough idea to finished clip without constant manual handoffs.
| Pipeline Stage | Input | Model Type | Output |
|---|---|---|---|
| Script Breakdown | Raw script or brief | LLM (GPT-4o, Claude 3.5 Sonnet) | Structured shot list and scene breakdown |
| Storyboarding | Shot list + reference images | Text-to-image | Visual panels with consistent characters |
| Animatic Creation | Panels + script or voiceover | Image-to-video + TTS | Timed video draft with rough motion and audio |
| Final Video | Animatics + refined prompts | High-fidelity video (Sora, Kling V3) | Production-ready clips |
Start collecting metadata right away. Store each panel with its shot type, such as WS, MS, or CU, along with camera movement, lens specs, and rough duration. That small step pays off later. Reviews get easier, and downstream video models have more context to work with.
Versioning matters too. Log every prompt, seed value, model version, and generation timestamp next to each asset. If a character starts drifting or a look needs to be recreated, you won't be stuck guessing what changed.
Using APIMart for Unified Storyboard and Video Workflows
When one project pulls from language, image, and video models at the same time, a single API can make life much easier. APIMart (apimart.ai) offers one API for 500+ AI models across language, image, and video, including GPT-5, Claude, Sora, and Kling V3.
Because APIMart uses an OpenAI-style API, teams can switch models with very few code changes. For example, you might begin with GPT-4o for script analysis, then move to Claude 3.5 Sonnet if you want a different parsing style. You don't need to rebuild the whole integration just to test a different model.
On the video side, approved panels can be sent into models like Kling V3, with per-second pricing that helps with budget planning. That matters when a project grows from a few shots into dozens.
Another useful piece is multi-modal input support. You can send reference images and text prompts in the same request, which helps keep characters, scenes, and visual style aligned across the storyboard.
Production Concerns: Latency, Rate Limits, Logging, and Cost Tracking
Once the workflow is connected, day-to-day reliability comes down to request handling at scale. Latency, retries, and logging shape whether the pipeline runs smoothly or turns into a mess.
Batch requests and add retry logic so failed generations don't stop the whole workflow. For larger boards, send requests in controlled batches instead of firing everything at once. That helps you stay inside rate limits and spot failures before they pile up.
Caching is also worth setting up. If your pipeline keeps generating the same establishing shot or background scene across multiple sequences, cache that output. It cuts repeat API calls and lowers costs on longer projects.
At the review stage, lock frames that already work and regenerate only the shots that need changes. Rebuilding the whole board every time is a fast way to waste time and break continuity.
It also helps to track spend at the project level, not just the account level. Break costs out by pipeline stage, like script parsing, frame generation, and animatic creation. That makes it much easier to see where money is going and which part of the workflow needs cleanup.
Best Practices and Final Takeaways
Creative and Technical Practices That Improve Results
Once the pipeline is mapped, disciplined shot planning is the fastest way to get better output. Don’t skip the shot breakdown and jump straight into frame generation. First, use an LLM to break the script into clear scene beats before you write shot prompts. That keeps the story logic in place and gives each generated frame a job to do.
After shot structure, the next thing to lock down is continuity. Set character references, lighting, color grade, and lens style before you scale generation. If you skip that step, characters tend to drift from one panel to the next.
Prompting matters too. Drop vague adjectives and use specific camera language instead. For example, "Low angle, 35mm lens, shallow depth of field, natural side lighting" will give you far more predictable output than "cinematic and moody." A simple structure helps:
- Shot type
- Action
- Environment
It also helps to generate low-resolution drafts first. Then upscale only the panels you approve, and regenerate only the shots that miss the mark. Keep a human review at every approval stage. AI can still miss spatial relationships, scene geography, and brand alignment.
Conclusion: What to Prioritize When Adopting AI Storyboard Generators
Use these priorities as the final adoption checklist.
Before you roll AI storyboarding into production, a few decisions need to be made up front:
- Workflow fit: Script parsing, frame generation, animatic assembly, and final video should connect without manual rebuilds between steps.
- Creative controls: Judge tools based on character locking and camera grammar support, not just image quality.
- Export readiness: Make sure exports match your delivery format and that collaborators can review and approve frames without friction.
- Cost and licensing: Track costs closely, cache reusable outputs, and confirm commercial licensing before any AI-generated frame reaches a client or moves into production.
The best teams use AI to speed up decisions while keeping a human lead in control. Use AI storyboard generators for speed and consistency, but keep human direction in the loop.
FAQs
How accurate are AI storyboard generators?
AI storyboard generators can be strong planning tools. But how well they work depends a lot on the guidance you give them.
They also don’t replace human creative judgment. That matters most when you’re dealing with things like complex character blocking or subtle emotional subtext, where small choices can change the whole scene.
You can get more consistent results by using character references, persona locks, and style boards. APIMart supports this kind of workflow with unified access to advanced multi-modal models that help maintain visual continuity across a sequence.
What files should I prepare before using one?
Prepare a clean, well-formatted script in a standard format so the generator can read scenes and action lines the right way. On top of that, add a written shot list that spells out the camera type, movement, and setting for each shot.
Also include reference images, or clear written descriptions, for your main characters and the overall visual style. When you lay everything out in clear scenes and visual beats, the output stays more consistent and feels ready for professional use.
How can I reduce character drift across panels?
Use dedicated character reference features, often called persona locks or consistency references. Start with a high-quality portrait for each character, then use that same image as the reference for every later frame.
For more complex projects, use model fine-tuning or image conditioning with a fixed reference asset. In APIMart, make sure your workflow clearly connects script beats to those reference assets so the storyboard stays consistent from frame to frame.
Related Blog Posts
Choose the model you want in the model marketplace
Try chat, image and video models in the APIMart model marketplace, and experience model capabilities quickly with one unified API.